Any DSLR / Lens combinatiin (You can use any lens, but I would stay away from wide-angle lenses for this).
Paul C Buff Einstein E640 Strobe with the “giant” soft-box attached (again, you can use any light/light modifier you want, but something that flasheswill give you the cleanest result. The LP180 is a good alternative).
PocketWizard Mini TT1 + AC3 Zone Controller (for Nikon, Canon versions are available too) on my camera’s hotshoe. This wirelessly triggers the flash and adjusts the flash power. You could use a Flex TT5 instead of the Mini TT1. Flex TT5s can also be attached to the foot of portable speedlight flashes to receive the signal.
Power MC2 plugged into the Einstein E640 strobe (The Power MC2 receives the wireless signal from the Mini TT1)
RFN-4 Wirelesss Shutter Release – this allows me to wirelessly release the shutter on my camera, so I can take pictures without having to physically be behind the DSLR.
Cheaper Alternative set-up:
The strobe can be replaced with an unused $200 LP180 speedlight, or even something like a used speedlight for ~$50 – the only difference is that you might need to raise the ISO and widen the aperture a bit, depending on how bright the speedlight is.
The fancy PocketWizard wireless trigger system can be replaced with the RF-603 trigger for $37. I am pretty sure these can be plugged into any strobe by using the PC Sync or audio jack port, as that is what I did with the older RF-602. I even sort of think the RF-603 are more responsive than the PocketWizards! Sometimes, for whatever reason my PocketWizards don’t want to respond and it can be frustrating. The RF-603 is smaller too.
Then, optionally, you could get a cheap light stand and umbrella for another $20-$40 (but you could probably get by without this, depending on what you are trying to do/photograph).
The cheaper set-up is the stuff I have been using all this time until recently (and still do use it). Remember, I took this shot with all entry-level equipment and it came out great. The flashes had to be close to the subject and have no light modifiers on them, but the shot still looks pro, and I was able to use 1/32 flash power (flash duration is super short, probably shorter than any given strobe, including the E640), and ISO100, F16 (ideal settings)!
Ideas:
You could experiment with different densities of liquid, and then drip a different color to each density, so it looks like a rainbow is flying out of the wineglass.
You can also just throw the wineglass up in the air, but you will need to be sure that it lands on something soft. I would recommend having it fall on an elevated sheet. Spinning it in a spiral could be interesting.
Final Image:
Check This Out Next:
If you liked this video, sign up to the e-mail list in the upper right corner of this site. Also consider checking out my photography course Trick Photography and Special Effects (meant for anyone interested in creative techniques) and Photography Masterclass (meant for beginners wanting the essential, universal, industry-standard information to get started; this course will show you how to use a DSLR, lighting, composition, and Adobe software).
In this digital photography and Photoshop tutorial, you will learn how to capture a photo using grids and gels on flashes to get the proper lighting. We will then go into the Adobe Photoshop software program and create the glowing lines and smokey cloud in front of the luminous face.
Push the play button on the video player below to start watching the tutorial – I recommend watching it in Full Screen so you can see the text when I am in Adobe Photoshop.
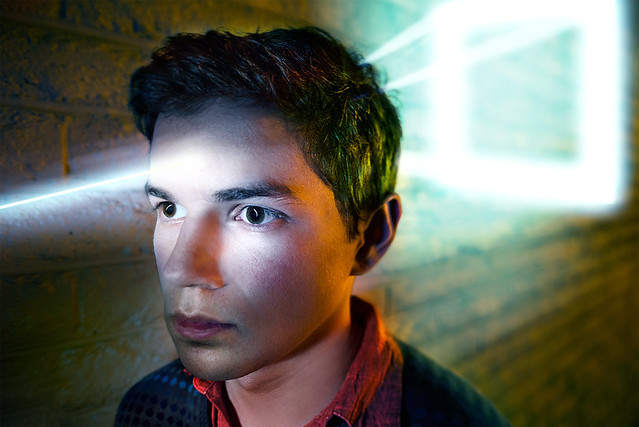
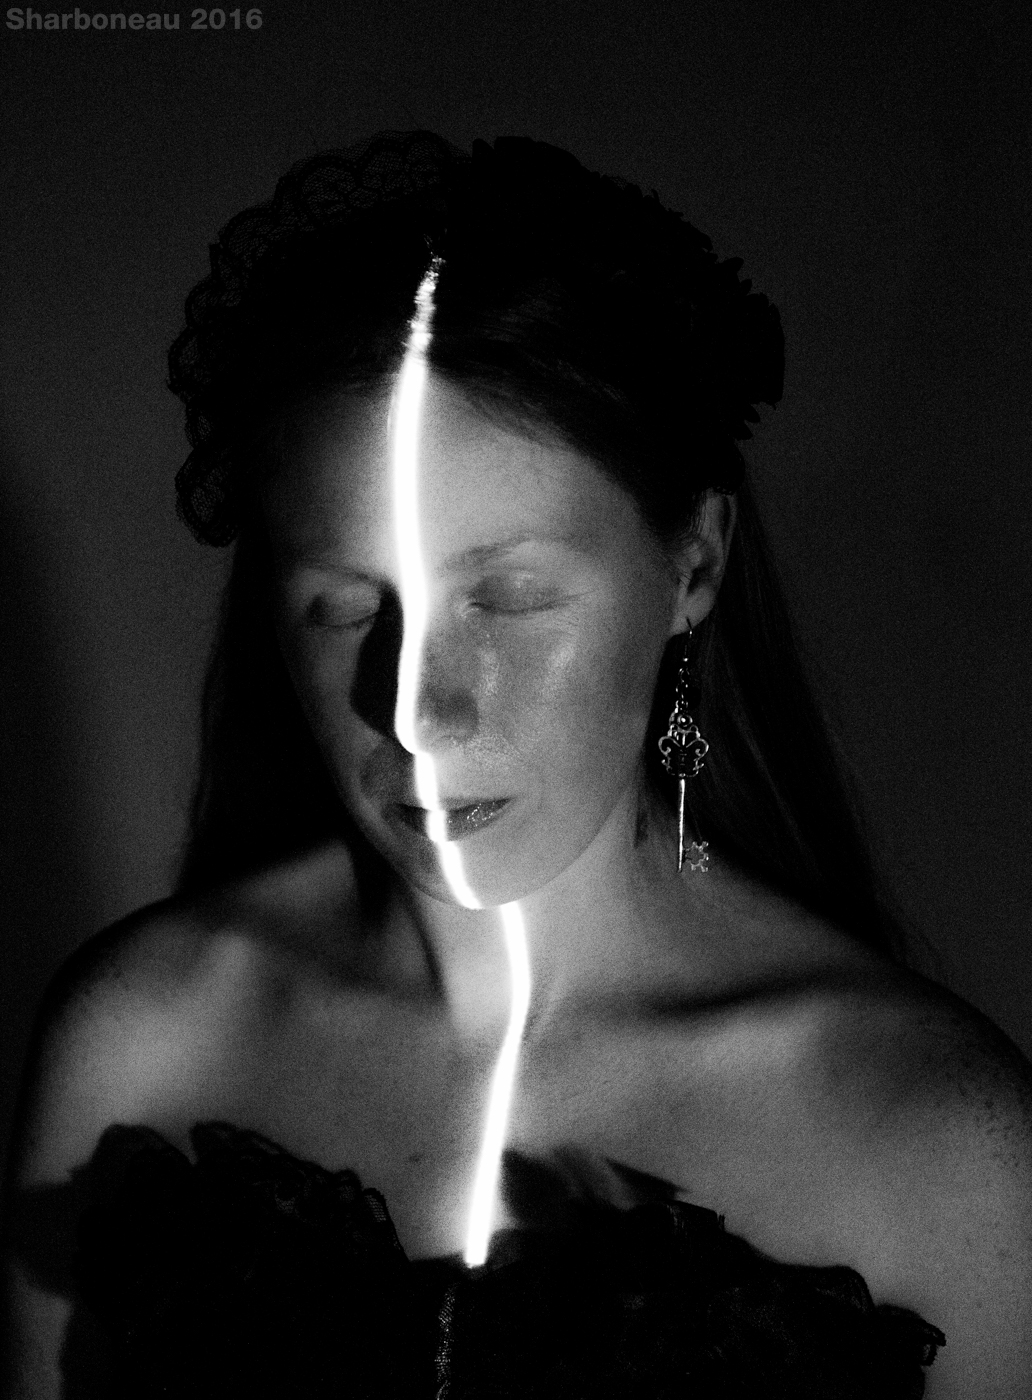
This is the newest image I’ve made with abstract glowing lines.
.
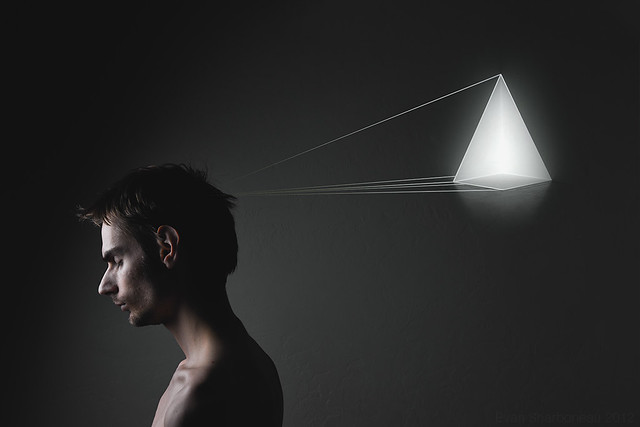
This was the first image I created that made use of geometric abstract glowing lines.
.
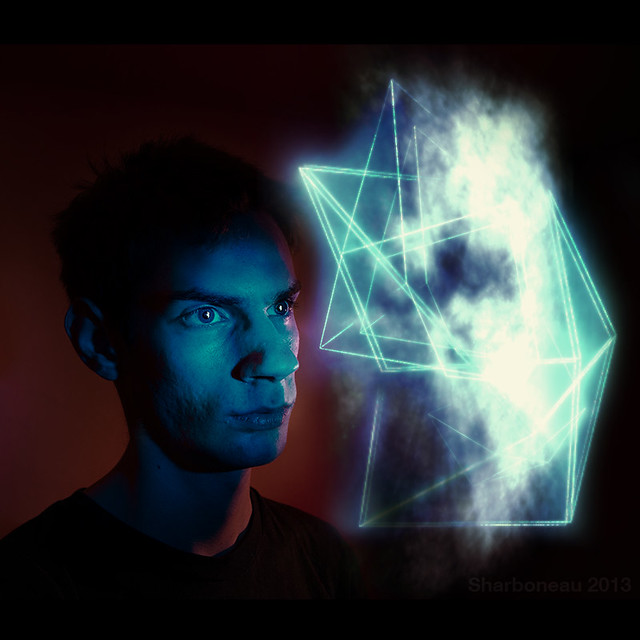
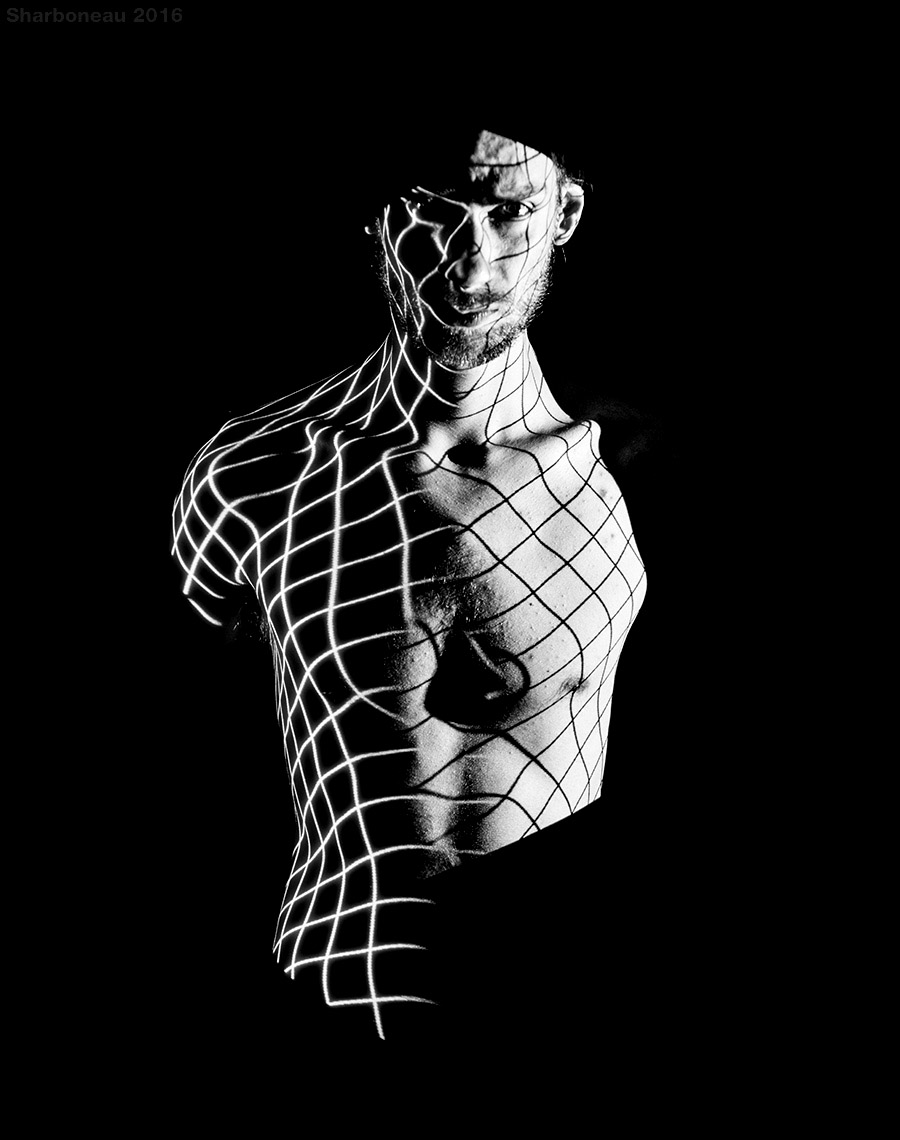
This image was made after the first one; my friend (the model) got the idea to make the original concept above more three-dimensional by taking the shot at an angle. We spent hours in Photoshop making the lines, perfecting the skin, removing harsh shadows, dodging and burning, and making the colors vivid. There is a before-and-after image here.
.
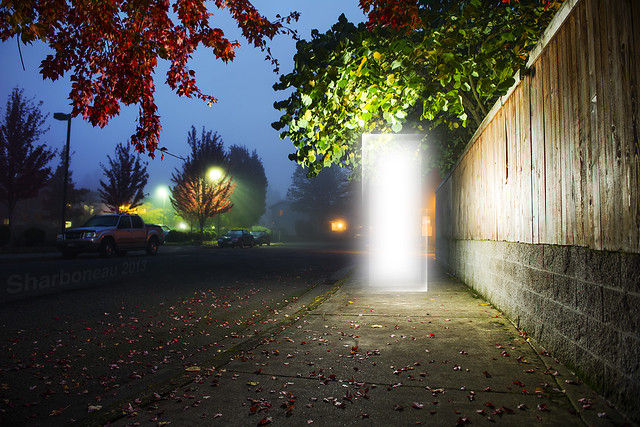
This one wasn’t made with the pen tool to create lines, but instead the rectangular marquee tool was used to create two rectangles filled with white on two separate layers, then I deleted portions of the two rectangles and added a glow to match that of its environment (it was a really foggy morning). The original lighting source in the scene was deleted using layer masks.
Yes (one at a time previews, rendering takes a few seconds)
Yes (thumbnails viewable page by page, takes time to render them)
No
Yes; instant full-screen rendering for rapid image browsing
Keystoning
Yes. Auto and manual; vertical only
Yes. Manual only; vertical only
None
Yes. Auto and manual; vertical and horizontal
Fits in standard camera bag?
Yes
Yes
No
Yes
Size
8.3″ x 5.3″ x 3.1″
6″ x 6″ x 1.8″
7″ x 7″ x 2.1″
Small enough to fit in standard camera bag (ie.somewhere around 8″ x 5″ x 3″)
Weight
2.4 lbs
1.96 lbs
2.5 lbs
Battery?
Yes
Yes
Yes
Yes
Gapless Video Looping?
No
No
No
Yes
Animated GIF support?
No
No
No
Yes
Special Features?
TV Tuner
1) Dedicated knob for adjusting lumens amount; 2) buttons, knobs, and ports below or flush with casing; 3) feet on all six sides for proper fan airflow; 4) 90 degree angled corners for proper vertical projection; 5) gapless video looping
The M4 can project images onto surfaces 9 to 150+ inches away from projector. When the projector is X centimeters away from the projection surface, the projected image will measure as X centimeters in length, diagonally – the other projectors are very similar in this manner.
Tripod mounts are on the bottom of all units.
Can read PNG, baseline rendered JPEGs (not progressive), BMP, and MP4 video files.
Manual focus only.
The M4 cannot be placed vertically.
Not all projectors are perfect, here is what I mean…
The Aaxa M4/M5 has the screen-door effect and is more pronounced when projecting images onto surfaces that are further away from the projector. The screen-door effect can be reduced by slightly defocusing the focus ring on the projector. The screen-door effect is not as noticeable on the M6 because of the 1080p native resolution.
The screen-door effect is more noticeable when viewing the image at 1:1, as shown above. The screen-door effect looks like little lines of un-illuminated space between each pixel, like a screen-door.
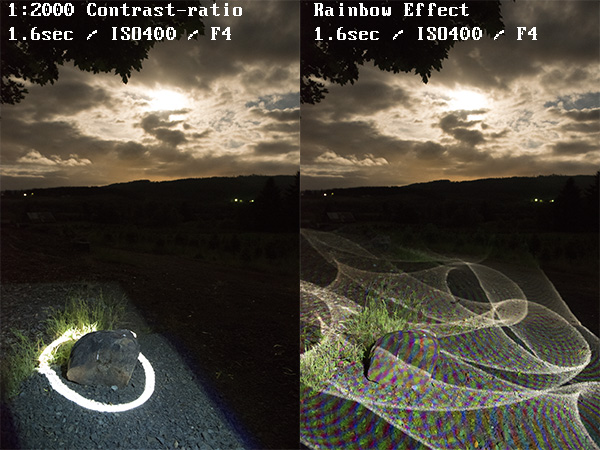
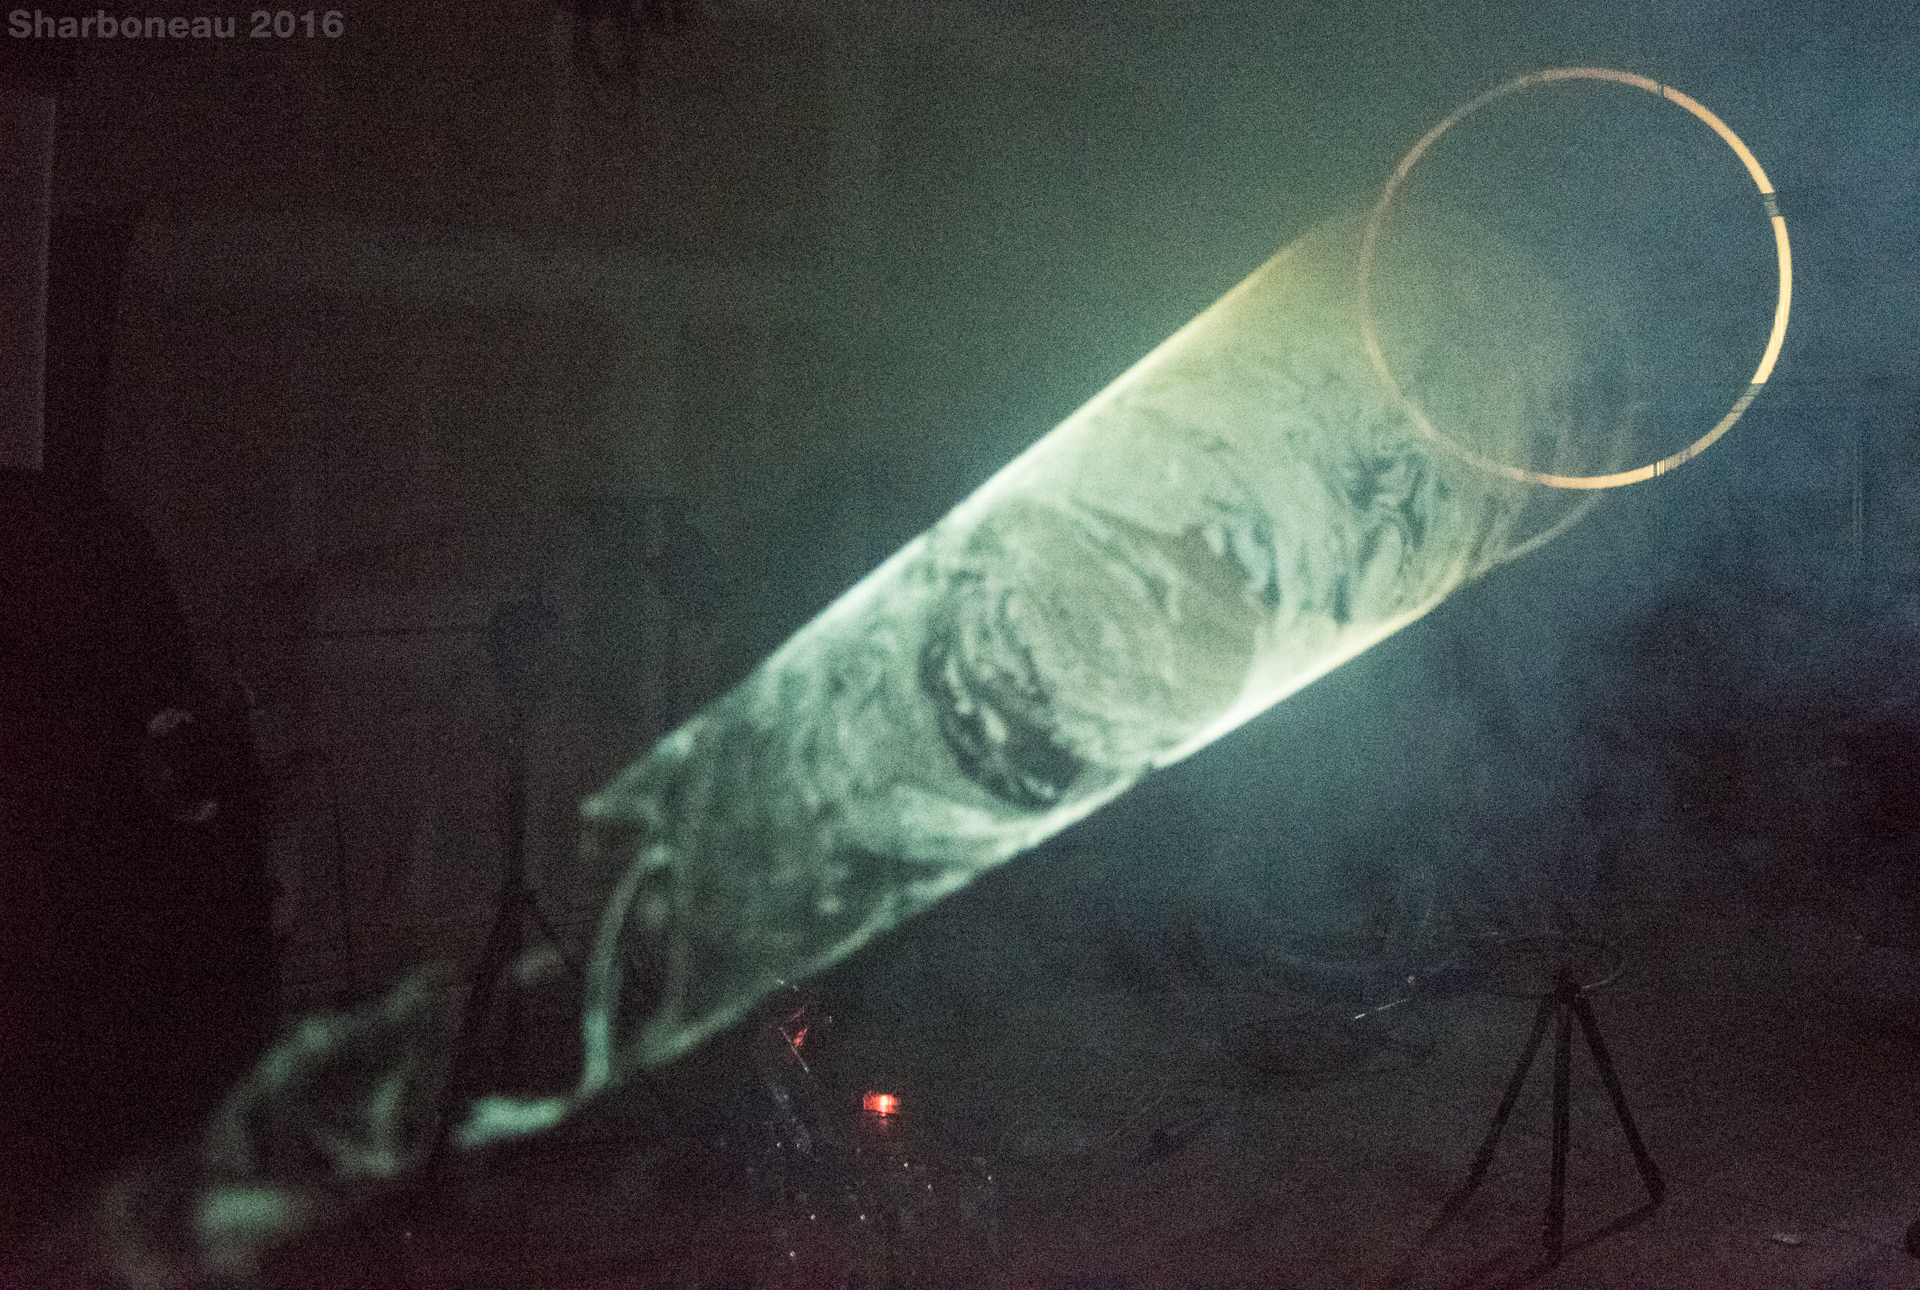
The image on the left demonstrates the 1:2000 contrast ratio, meaning that black pixels still project out light that can be seen (see the faint rectangle?). The image on the right demonstrates the rainbow effect and is a 1.6 second light painting long exposure of the same circle shape being projected as the image on the left, with the only difference being that I moved the projector back and forth to create light trails throughout the 1.6 seconds. As you can see, the circle does not render as white when moving the projector around, because the projector rapidly shifts between projecting red, green, and blue. In order for the projection to render with no rainbow effect, you will need to use a shutter speed of 1/80th or slower and make sure that the projector or whatever comes into contact with the light is not moving at a fast pace. You could also use a LCoS projector instead of a DLP projector. The projector was roughly 2 meters away from the rock.
The Aaxa M4/M5/M6 projector could be improved in that:
A gapless video looping option would be very useful, as well as the ability to display animated GIFs. (email them and tell them to update the firmware!)
When displaying an image with a small resolution of say 4×4 pixels, it will resize that image to be 800×800. There should be an option that allows you to stretch it to fit screen (in this case 800×800) OR to display it as 4×4. (Email them!)
Keystoning should be more expandable.
All corners should be 90 degrees and there should be feet on all six sides of the unit.
With all that being said, you can do some pretty cool stuff with this projector. Here are some ideas:
Techniques and Ideas
Projecting patterns onto humans, landscapes, flora, and objects all work well.
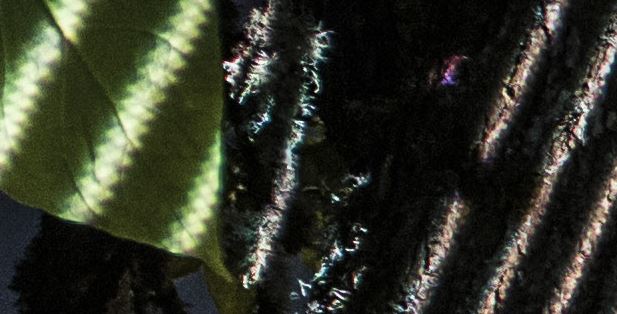
Projector camera right, roughly 5 meters away from the tree base. See a previous image in this article to see how the screen-door effect is noticeable when this image is zoomed in at 1:1.
Notice how the 1:2000 contrast ratio is not noticeable in this photo – the projected blacks are not noticeable/illuminated. This is because this picture was taken just before night time, where there is enough atmospheric ambient light to over-power the black pixels of the projected light.
The screen-door effect can be significantly reduced when placing the projector extremely close to surfaces. No screen-door effect is noticeable even when viewing the image zoomed in at 1:1, although you may notice a tiny bit of chromatic aberration.
Concentric circles being projected onto tree branches. For tree branches in particular, placing the projector as close as possible to the camera will produce the cleanest, in-tact projection. The further the projector moves away from the camera, the more difficult it will be to identify what you are projecting and the image being projected will just appear to be a jumbled mess of light due to the chaotic complexity of the tree branches.
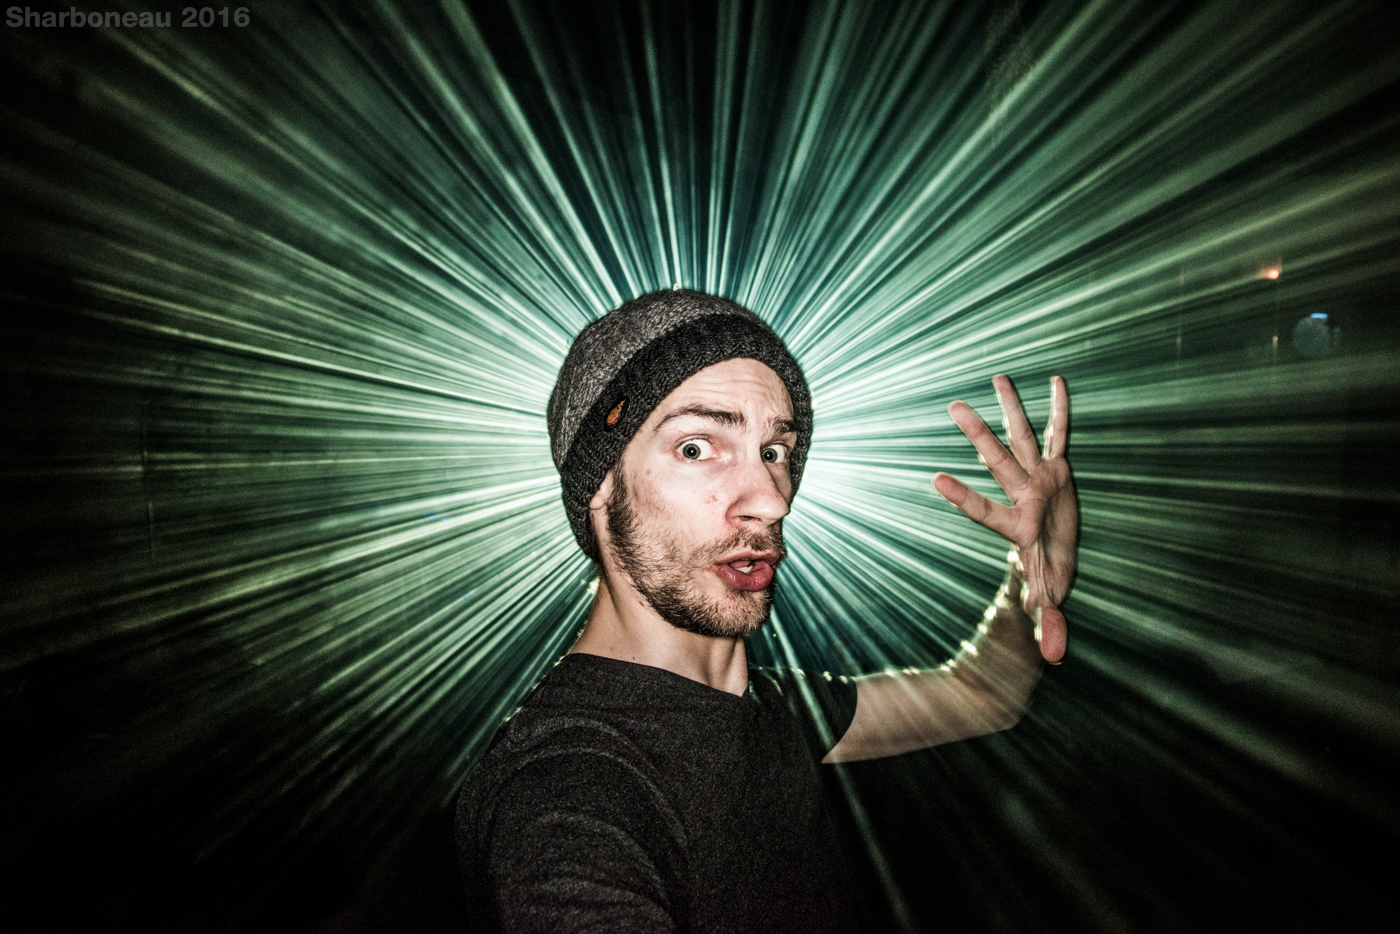
The projector can be used to light up your scene with psychedelic colors.
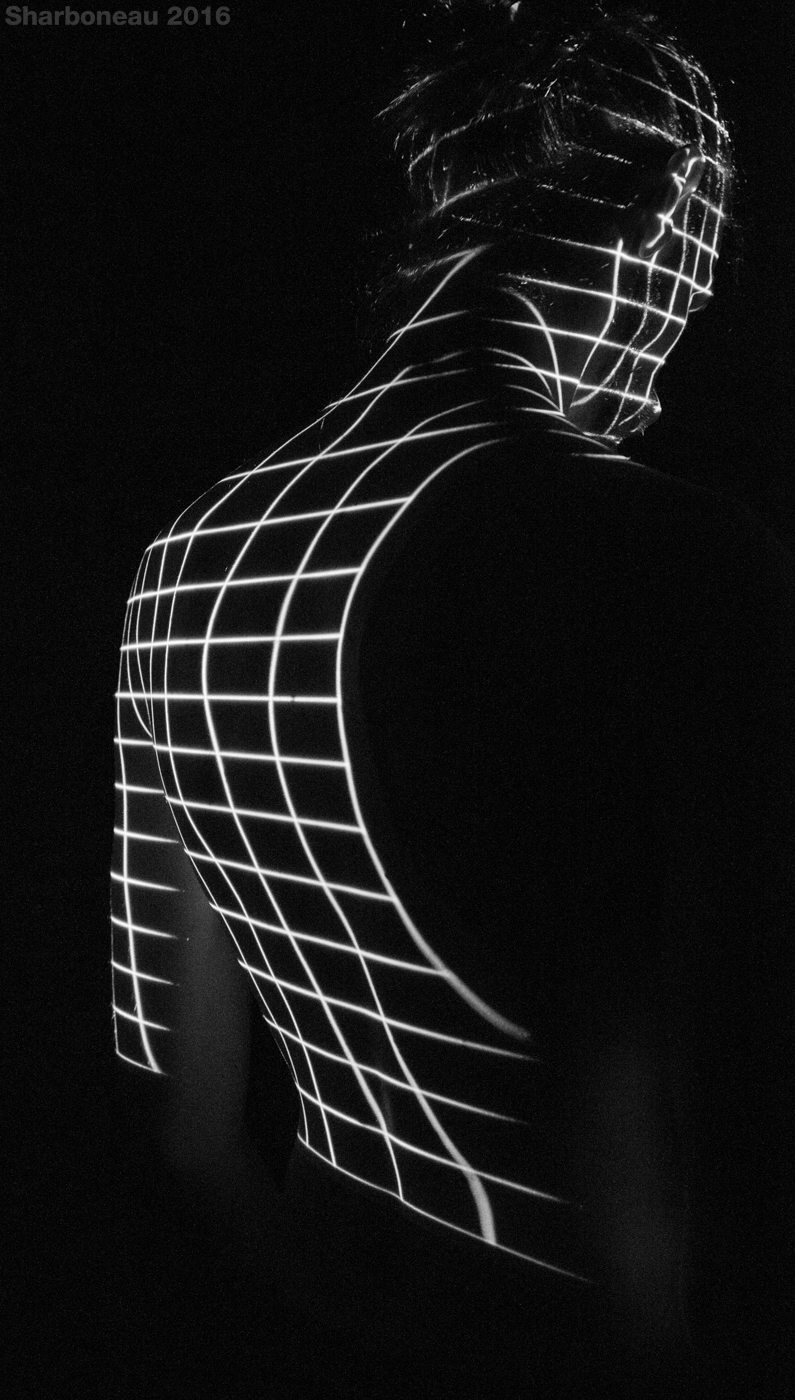
The sharpest lines able to be projected are horizontal and vertical lines. Diagonal lines can be projected, however you may see some pixelation. The screen-door effect is apparent when projecting horizontal, vertical, or diagonal lines. The screen-door effect is not noticeable in this image because the projector was close enough to the model. One projector aimed at his back, the other at his front.
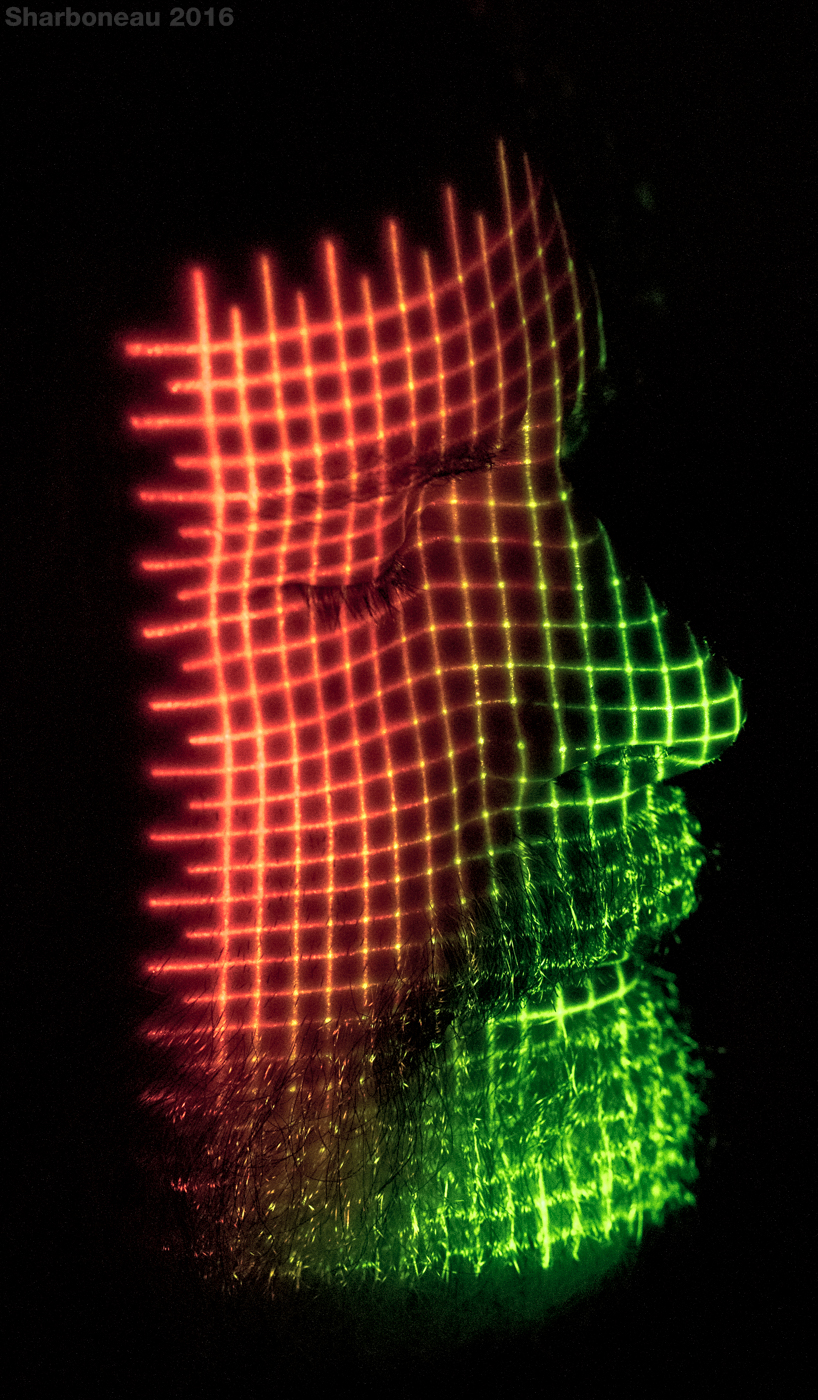
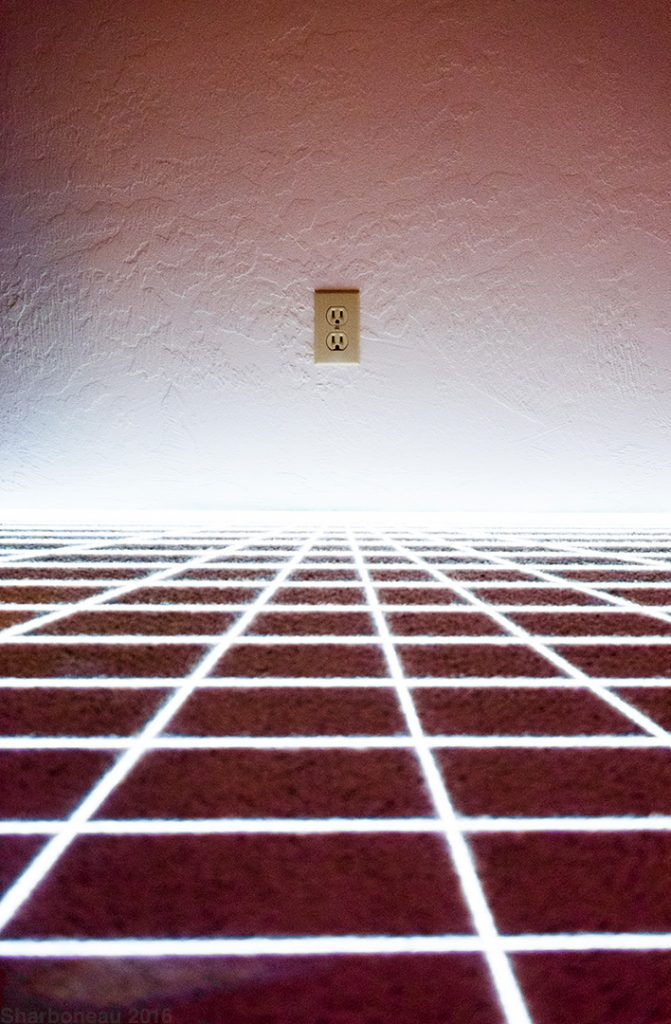
Again, placing the projector as close as possible to surfaces will create the cleanest projection. This photo was taken with a shutter speed shorter than 1/80th, and thus the white grid looks red and green due to the rainbow effect.
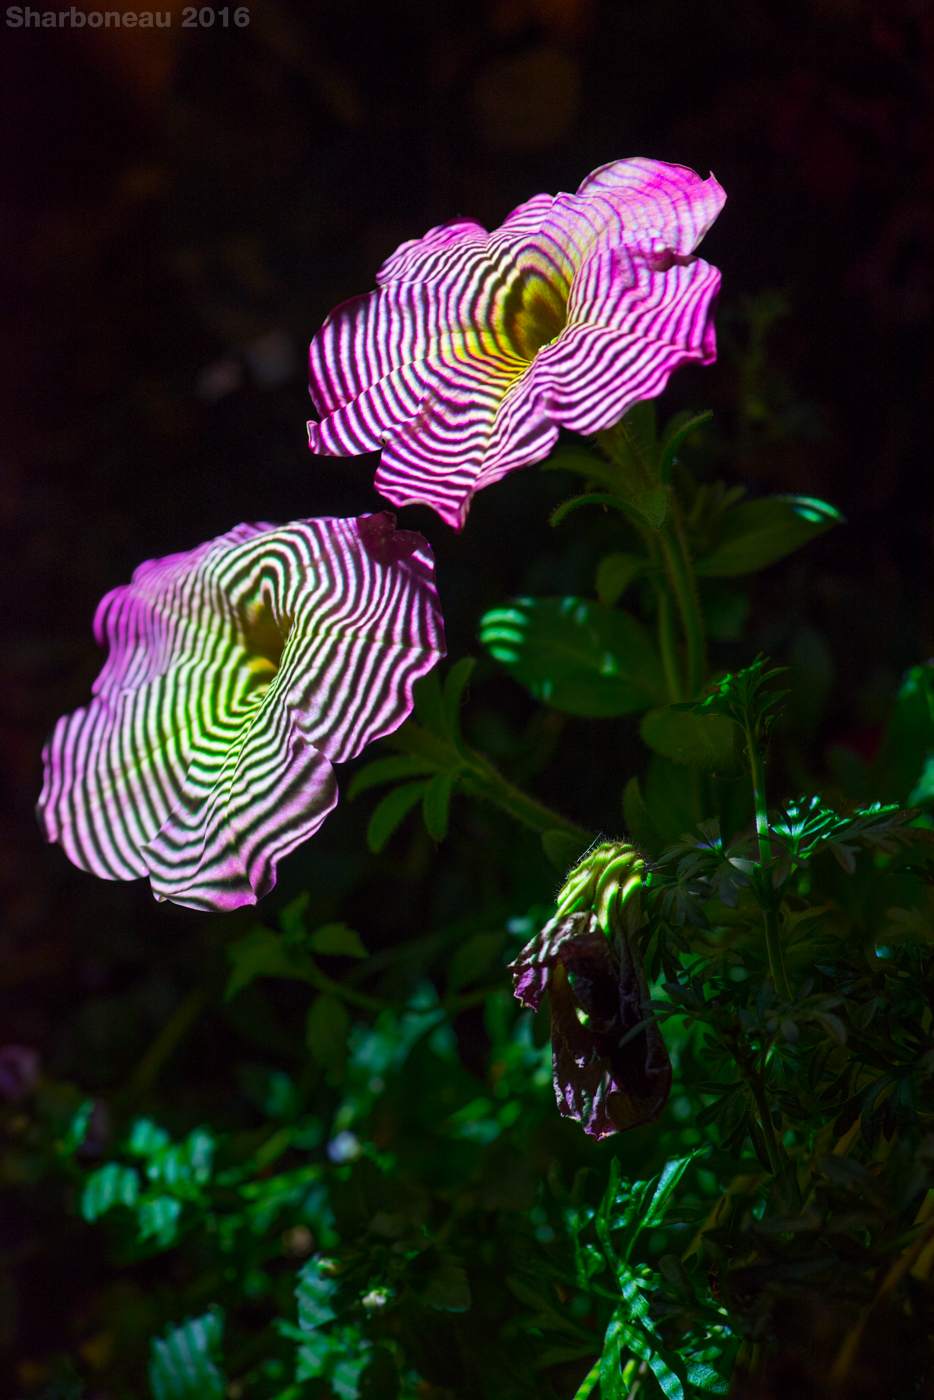
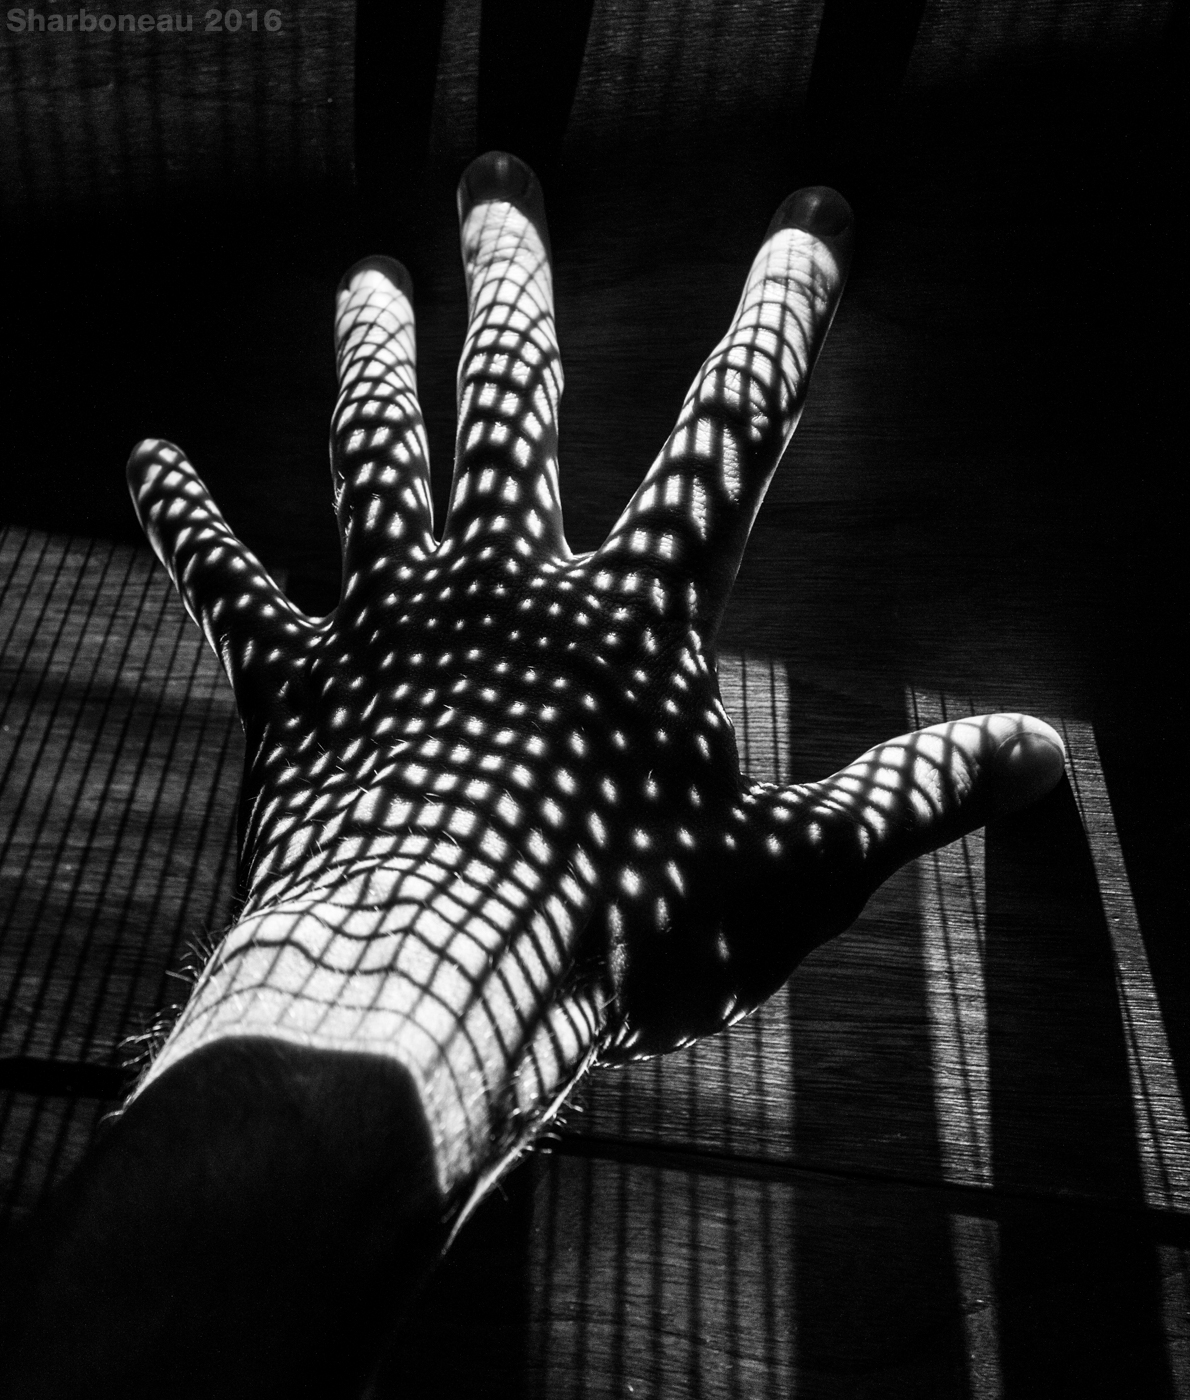
Projecting half-tone patterns works particularly well, as half-tone patterns use geometric patterns to transition from light to dark.
Same thing as above, except the projector is behind me pointing at the camera, projecting a star field space photo through fog. On-camera flash was used for fill light.
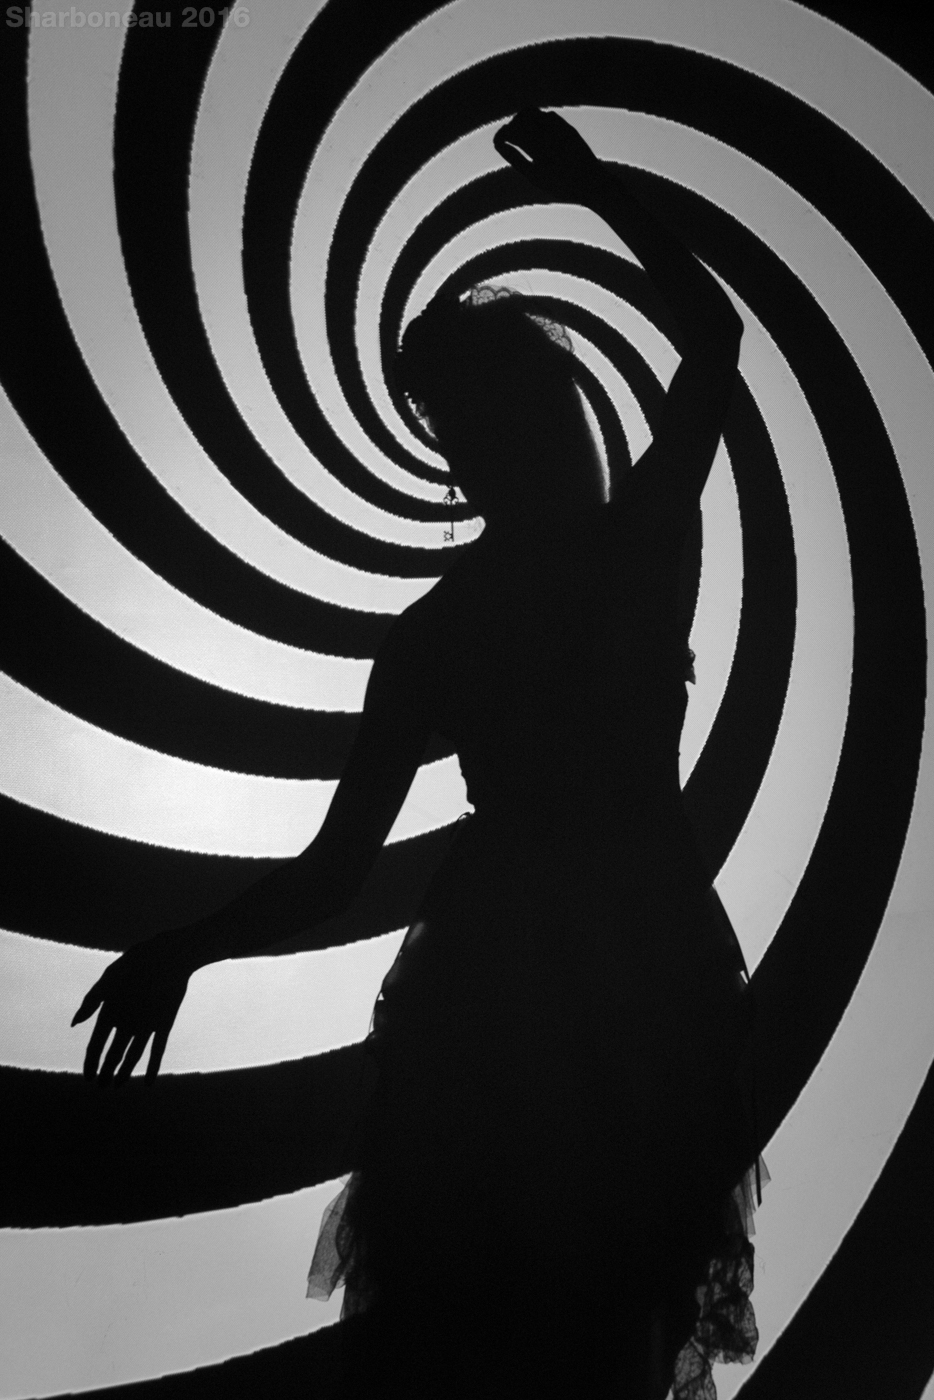
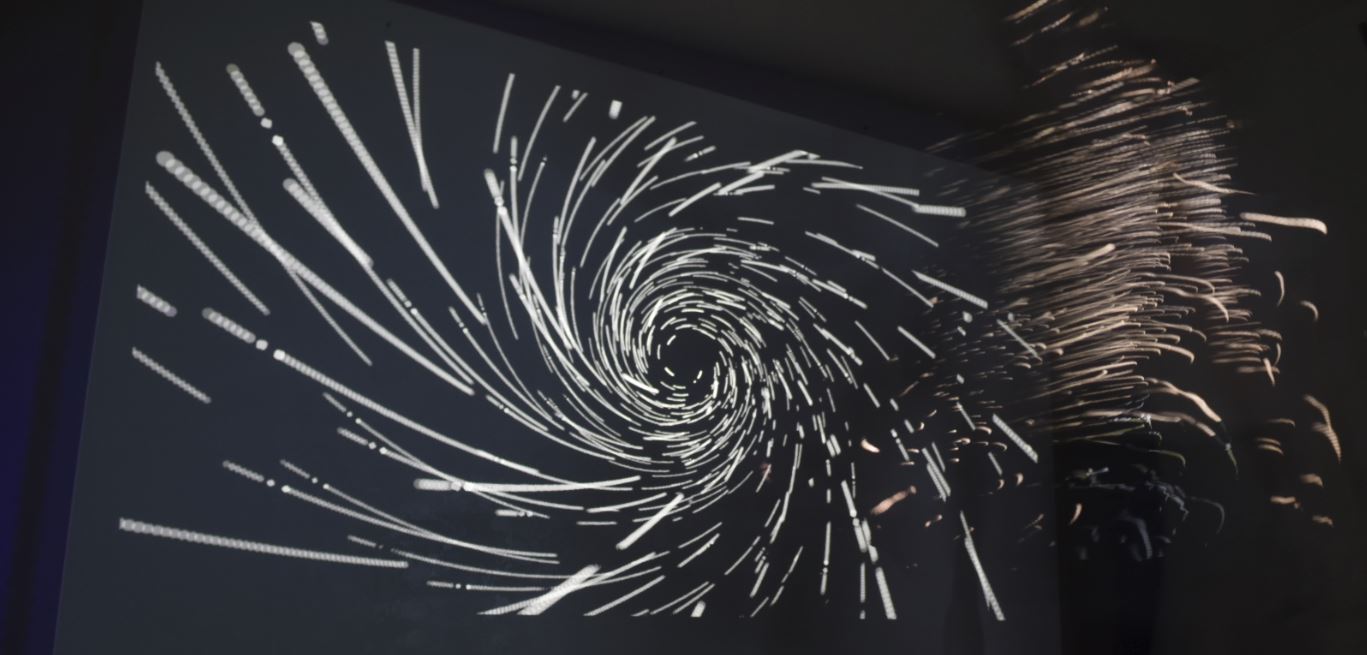
A spiral was projected onto a wall/background, creating a silhouette of the model, who was standing in front of the projector. You can see pixelation in this image due to the low resolution image that was used – remember that pixelation can be reduced by defocusing the focus ring on the projector, and can come out quite well with bold, simple patterns such as hypnosis spirals.
You can turn on Live View mode when using a DSLR or video camera and then plug it into an input port on the projector to project out what the DSLR sees… this basically means that you can project an image of what is already there onto what is already there, and then take a picture of it. You may need to use two DSLRs to do this though, as the DSLR you plug into the projector may not be able to take pictures and be in Live View at the same time.
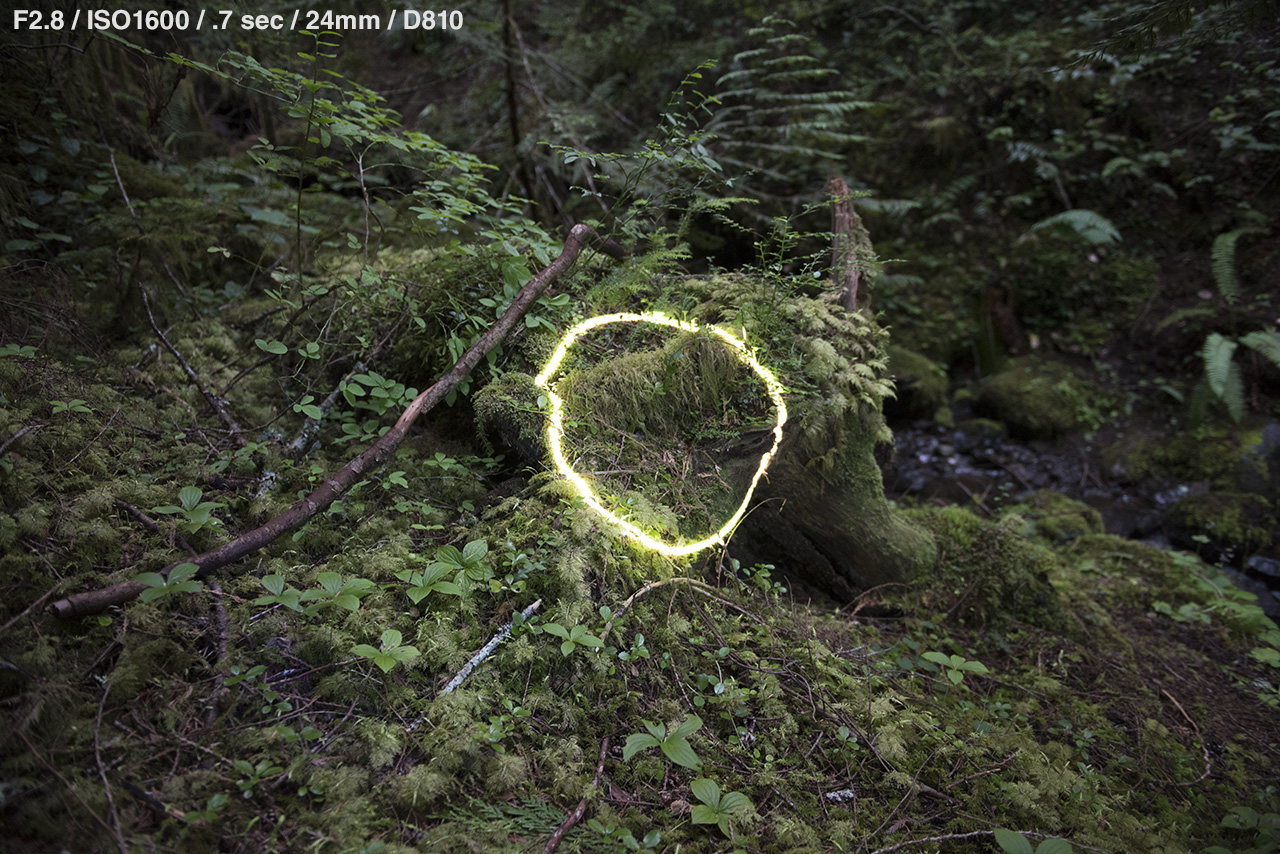
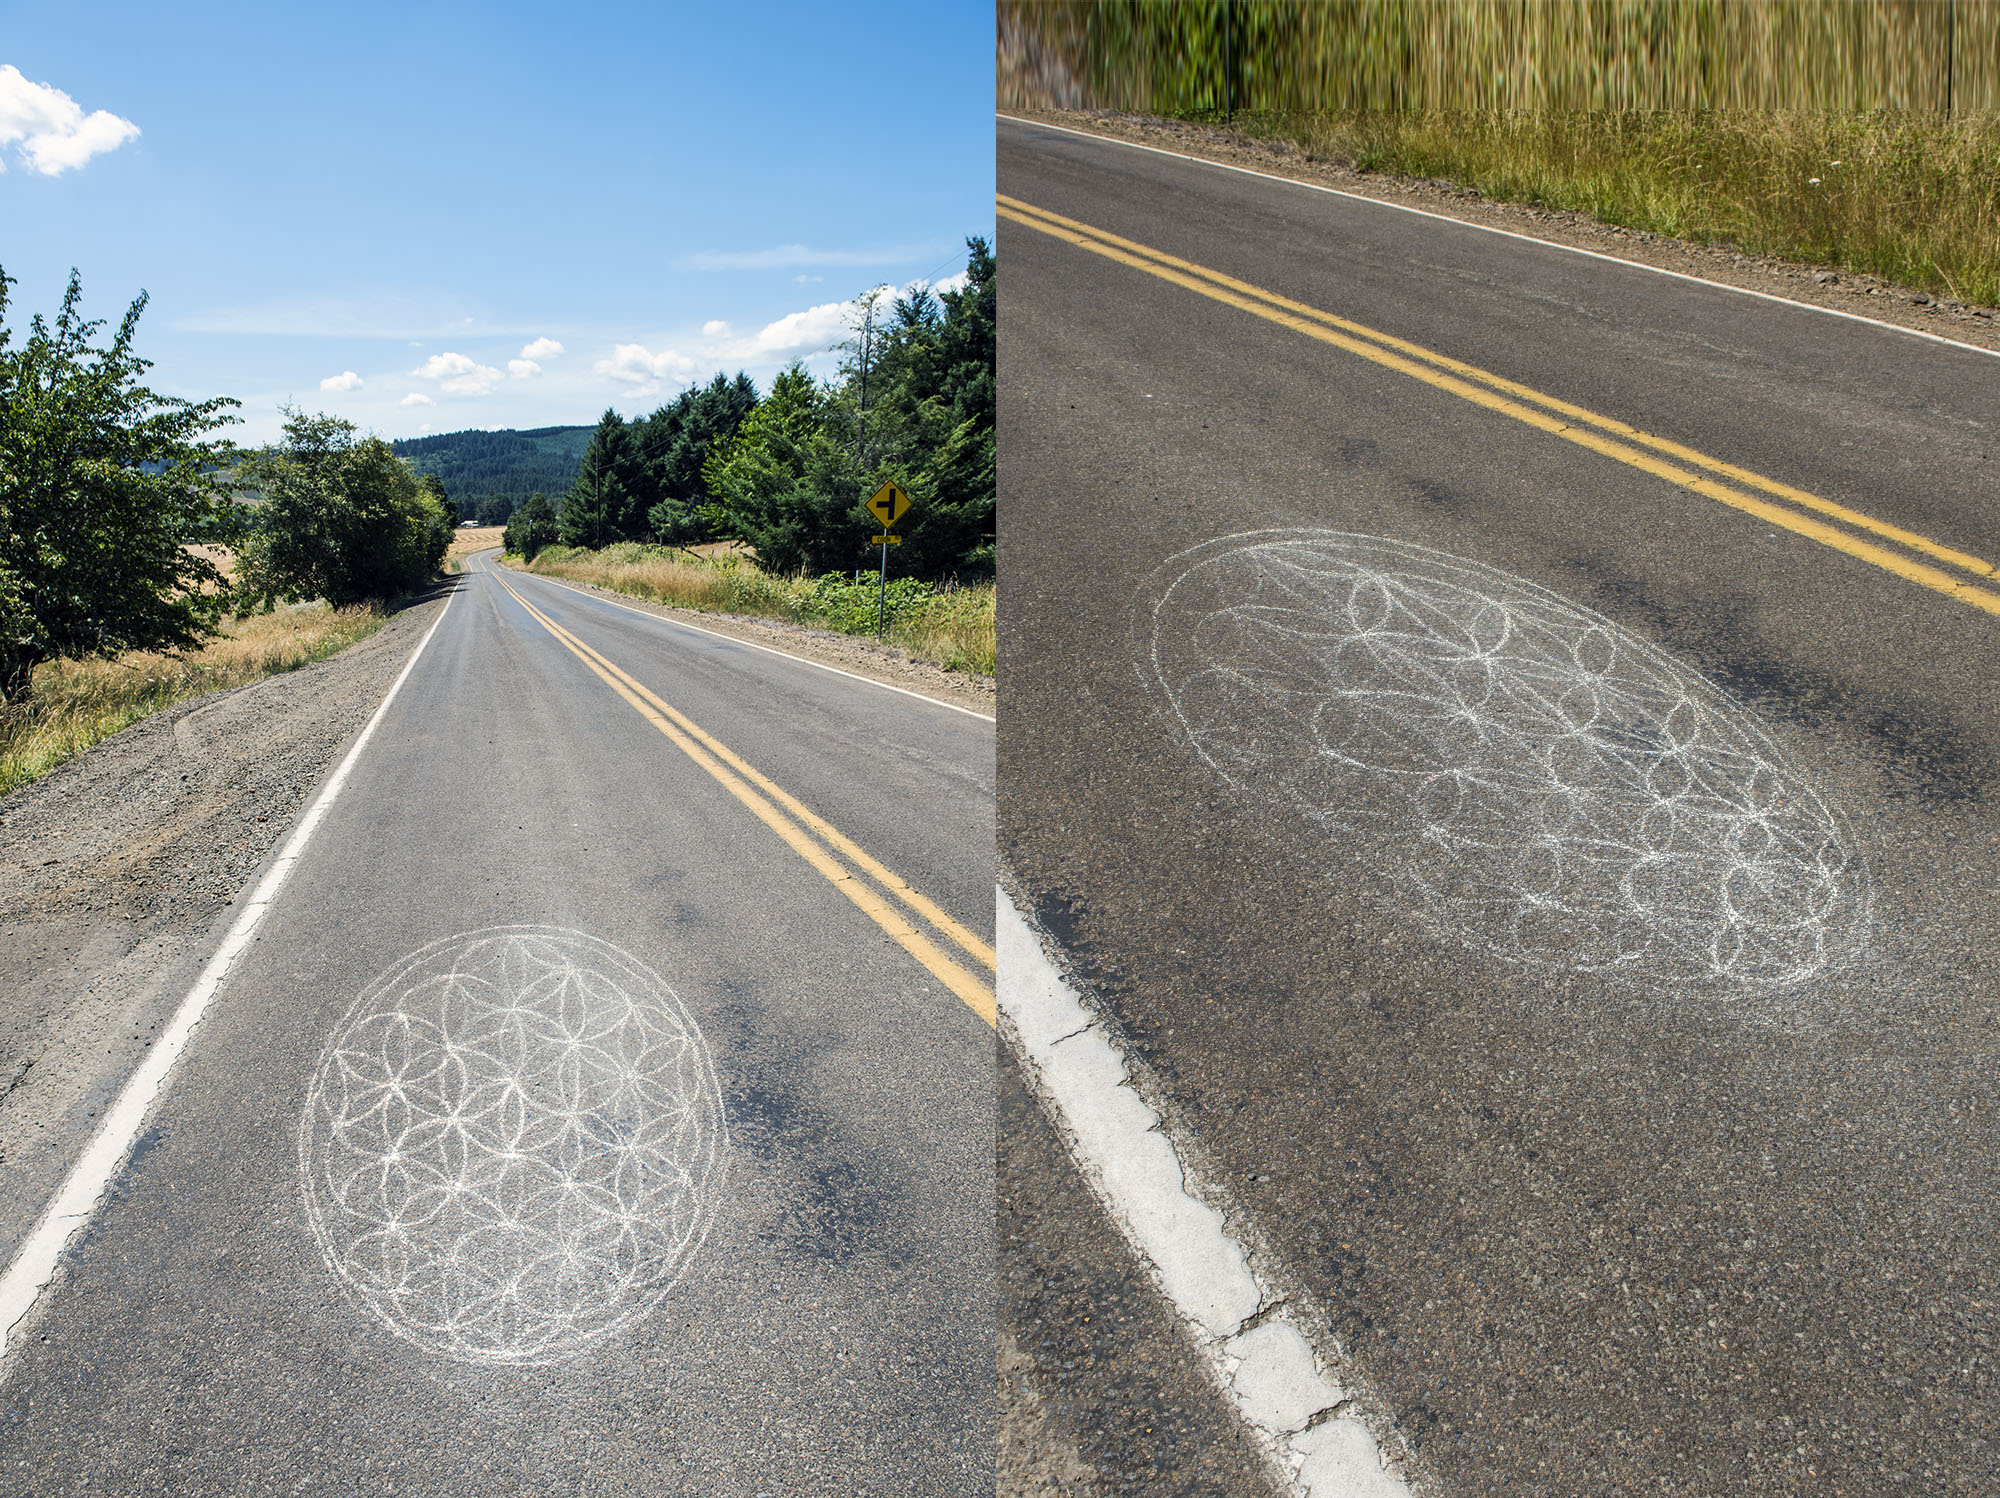
Keystoning is a feature the projector has where it can shift the perspective of the projection so it appears correct from the projector’s point of view (vertical correction only). This picture was created by placing the projector onto a tripod, aiming it downward roughly 35 degrees or so, projecting out a symbol onto cement and tracing it with chalk at dusk. Then when in daylight, I put my camera where the projector was and took a picture. As you can see, it appears to be a perfect circle even though it is on a surface that is stretching out towards the vanishing point. The second image you see on the right is the same thing, just shot at a different angle, and thus looks distorted from that point of view. This technique can be taken much further to create realistic optical illusions – painting the cement to make it look like the asphalt has collapsed and there is a hole in the ground, for example.
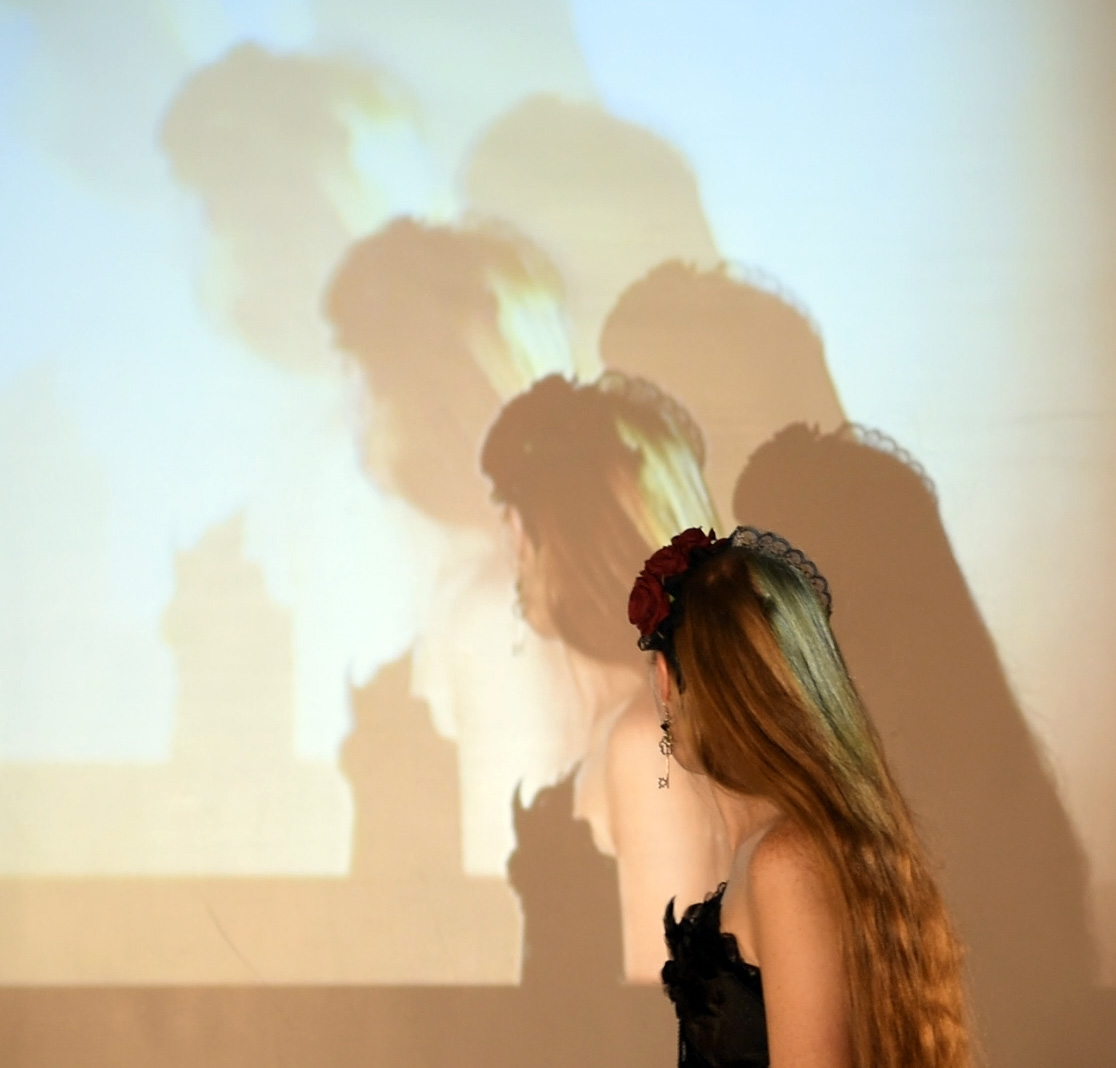
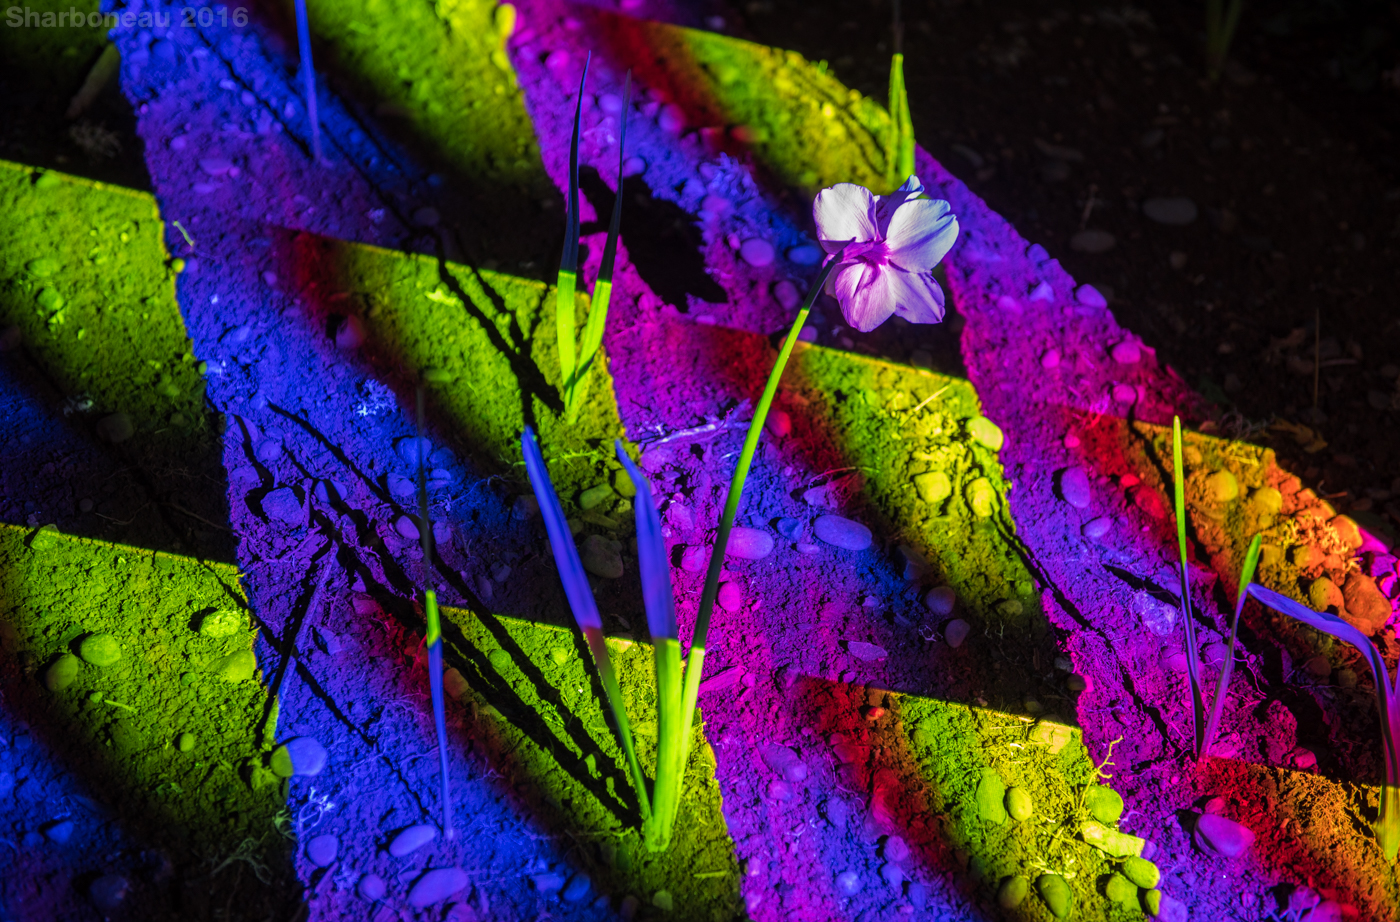
Gradient tiles being projected onto a garden. Note that this is not the same thing as going into Adobe Photoshop and placing the same gradient over an image – when a projector is used, real photons are hitting the physical 3D surface of the object you are photographing and taking its shape/form. The projection will cast shadows as well (depending on what you are photographing and what angle the projector is at), whereas Photoshop will not do that. Different material absorbs/reflects different wavelengths of light at different rates as well, which is another thing that is impossible for Photoshop to emulate.
This image, taken from my projector images pack (which I’ll talk about later), was projected onto the floor to give it a retrowave vibe.
Other Techniques and Ideas:
You can hook the projector up to a laptop (or tablet/phone) and use Adobe Photoshop, Adobe Illustrator (or whatever else), live, in real-time, to draw light onto surfaces with maximum precision. You can do the same thing using animations as well. Just hit the F key twice to enter Full Screen Mode when you are in Adobe programs.
You can project a pattern onto a model, and have the model move around to create an interesting long exposure light painting abstract. You can also project a video of a moving pattern onto a model or anything else, and have them move around (or not) to create another type of long exposure light painting. Here is a long exposure of white dots/stars spiraling inward, with a model on the right.
You can take a long exposure image of a person walking in front of the projector a few meters away, walking from the left side of the projection to the right side of the projection while projecting a video where a white scan-line starts at the top row of pixels, slowly slides downward, and ends up at the bottom row of pixels. This is known as slit-scan photography. More information about this specific technique will be in the image pack.
You can use the projector as a light painting device for long exposures, being able to project any shape or color of light onto any surface, and be able to change the color of the light as it is moving at any speed.
Alternative Projectors
There are projectors out there that are brighter and higher res than the portable Aaxa projectors, however they are larger, heavier, more expensive, and do not come with an on-board battery. Here is a comparison of the most relevant projectors that are ‘better’ than the M5 that I could find during my research in 2016. As far as I know right now, LCoS/SXRD technology (as opposed to DLP or LCD) reduces screen-door effect and eliminates rainbow effect, and using lasers instead of LEDs as the light source also reduces screen-door effect and requires no focus ring; comment below if you have anything to add regarding this.
A gobo is a physical stencil or template slotted inside, or placed in front of, a lighting source, used to control the shape of emitted light. You can make the shadows of the projection sharper by making the lightsource smaller in relation to the gobo stencil, use non-diffused light sources, and/or increase the distance of the gobo from the light source. Miniature krypton light bulbs that are used in Maglites can produce extremely sharp shadows because the light source is so small. Non-diffused tungsten light bulbs can also be used and create decently sharp shadows.
The Light Blaster is a type of gobo/light combo system that converts your portable speedlight flash into a slide projector. I prefer the Aaxa projectors because of the unlimited amount of patterns and sizes of projections that can be projected, however a speedlight would be better if you wanted to capture highspeed images of say fog or rain, where you could see each individual particle very clearly with no motion blur.
Other than that, I have not looked into other projectors that could be used. If you have any specific recommendations for something you feel is better than the M5, feel free to leave the name of the projector down below in the comments and a reason or two of why it is good/better.
Image Pack
I’ve created an image pack which contains hundreds of images/videos that can be used with the Aaxa M4 projector (or any projector, really). The image pack contains a variety of shapes, colors, patterns, half-tone patterns, slit-scans, and videos, all organized in their appropriate folders with the filenames titled for ease-of-use.
After downloading the image pack, simply extract the folder onto a micro SD card or USB stick, put that in your projector, and you now have hundreds of images to work with! Boom done!
The Projector Photography Image Pack should be able to be purchased here within the next few months.
Projector Buying Guide: Broad over-view of projector types. Reviews all of the vocabulary involved in the second half of the article.
Dani Oliver is a projection photographer who has explored in-depth photographing nude women, and has a very good book available that showcases many many photographs.
And that is that! The bottom line is, you can use this projector for all kinds of stuff! It has many applications for photography and something that could be a great addition to your kit! Hopefully the technology will improve with time as well, and some of the features I listed out will be a reality someday.


