If we take a look at the electromagnetic spectrum, we can see that visible light is only a small part of it. Our eyes can only see/detect/sense visible light, however there exists a much wider range of light, including ultraviolet light and infrared light which are invisible to the naked eye and cannot be detected directly.
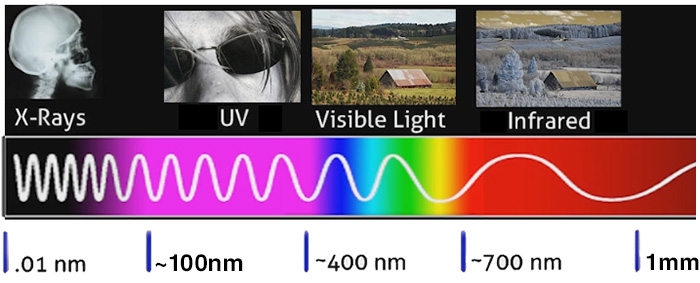
Ultraviolet light has a shorter wavelength compared to visible light, while infrared light has a longer wavelength compared to visible light. The wavelength of any given category of light is physically very small, so the common unit of measurement used is nanometers, or nm for short.
In my own terms, Fluorescence refers to the phenomenon that occurs when you shine light of a particular wavelength onto a material object which absorbs part of that energy inward but then re-emits part of it back outward. The wavelength that is emitted outward will always be longer than or equal to what was originally shined onto it. All material contains different properties that fluoresce differently than the next (some brighter, some different colors, etc). For instance:
If I shine a UV light onto a wall that has a certain type of white paint on it, the white paint will reflect almost nothing back outward towards me in the visible range that I can see.
If I take the exact same UV light and shine it onto an a white piece of paper, however, I will see a very bright blue spot on that piece of paper reflecting back at me, because it is a different material containing different properties than the white paint.
If I take the exact same UV light and shine it onto a different type of material that also appears white under the same lighting conditions as in the previous two examples (lets say sunlight), depending on the properties of that material, it could fluoresce a different color when exposed exclusively to UV light, so long as it is a longer wavelength (ex. the material might appear more purple or more yellow compared to the other types of material previously mentioned), with the brightness also varying from the previous two examples. Many things that appear pink in visible light will fluoresce pink, however Pink holi powder, for instance, fluoresces orange/gold when exposed to UV light. Certain types of plastic that appear black under visible light appear orange when under UV light.
The only difference between the three examples mentioned above is the different type of material. All material will look different than it does in visible light when exposed exclusively to UV light. The material can appear to be a different color than it normally does under visible light or appear more or less bright than how it normally would in visible light. How much energy the light looses is determined by the material’s Stoke’s Shift. Different material Has different stoke shift amounts.
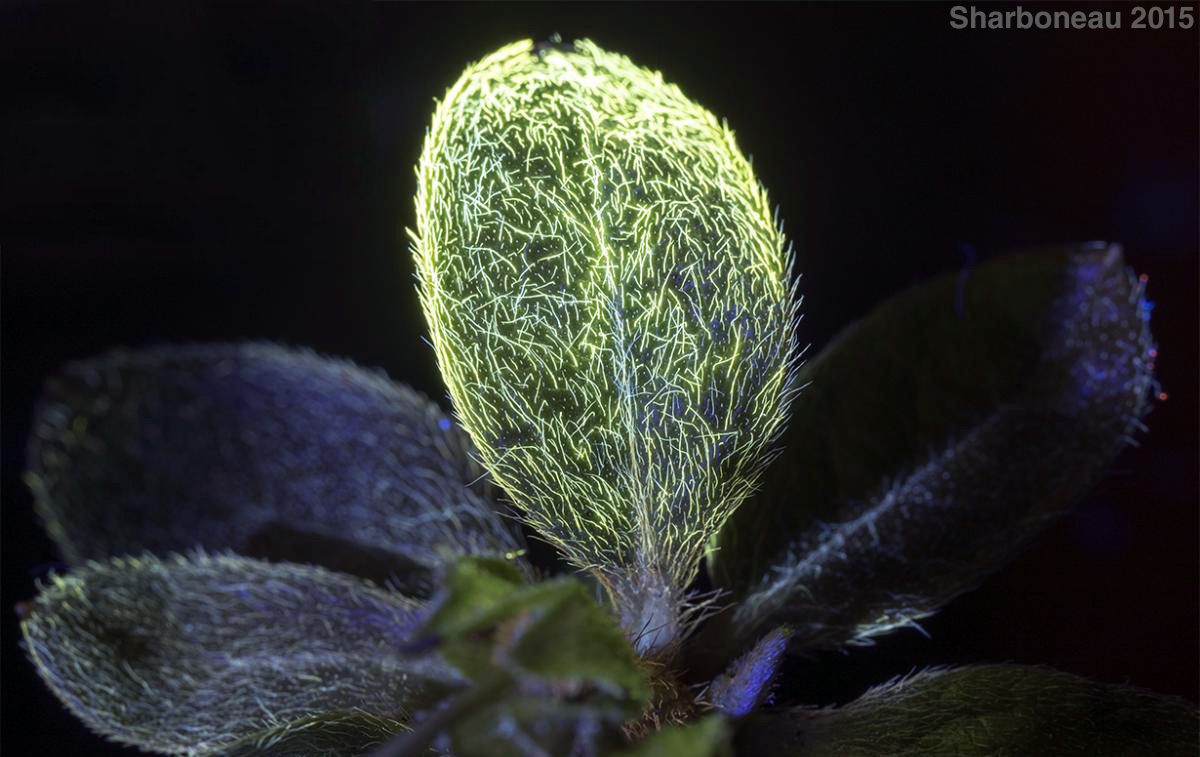
The plant above has some leafs with trichromes (hairs) that fluoresce very brightly when exposed to ultraviolet radiation. No UV dyes were applied to the trichromes, they fluoresce that way in their natural state.
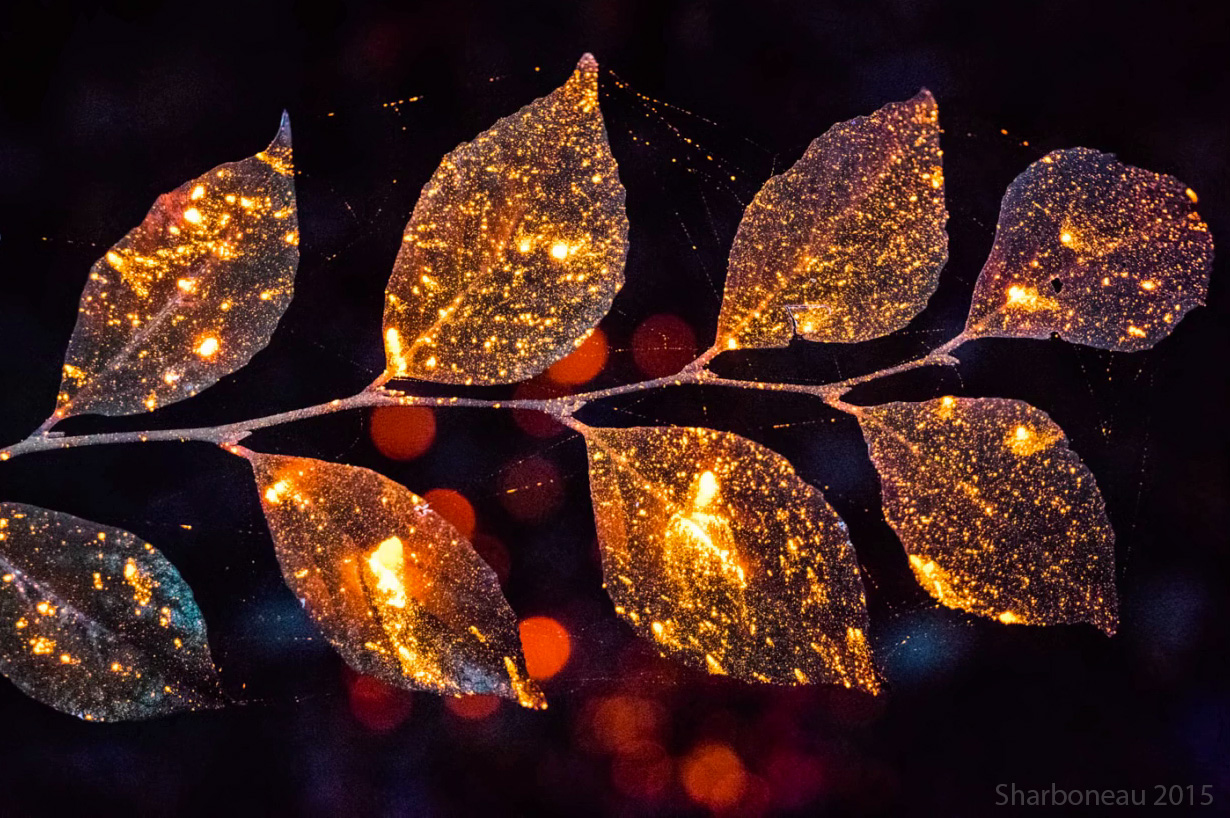
Leafs with a pink holi powder on them fluoresces orange/gold.

Yes, some bright neon material fluoresces very brightly, and that is what most people think of when they think of the word fluorescence. However, given enough exposure time, ISO sensitivity, and aperture size, you can photograph any material and view it properly exposed. Paper and white cotton, for instance, fluoresces very brightly, so a shorter exposure would be used. Dirt and leafs, however, usually do not emit out as much visible light, so you need either a brighter light or a longer exposure time to capture a proper exposure of that material.
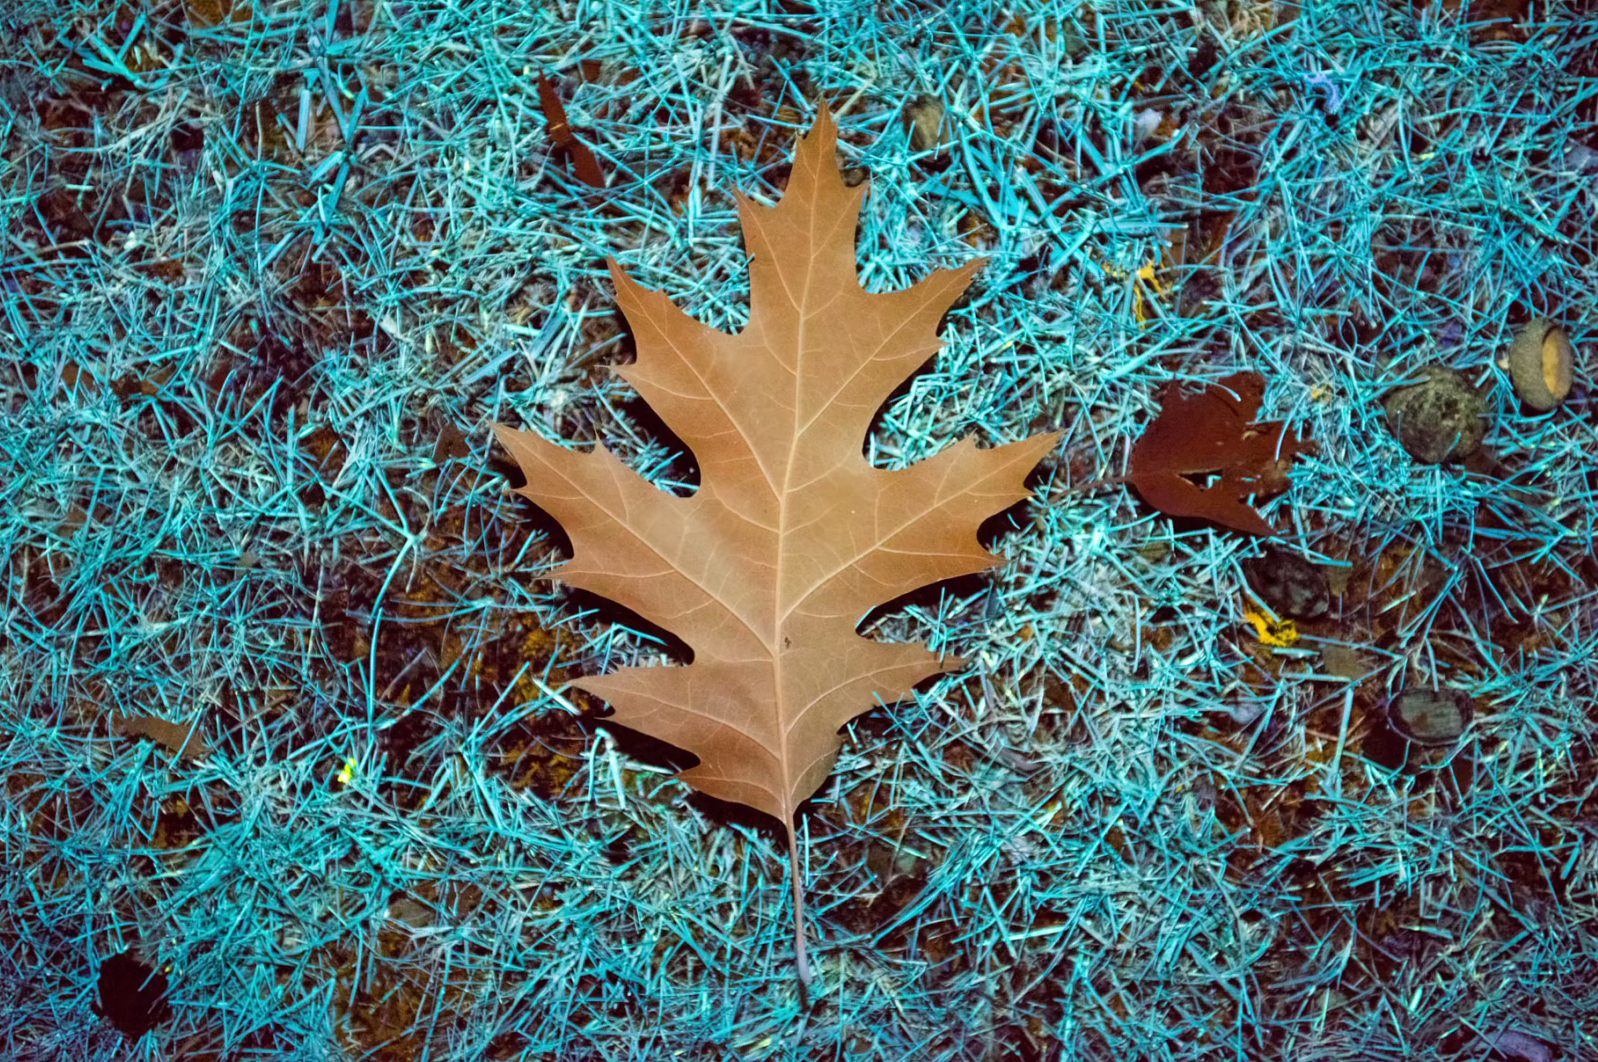
Leaf on grass.
Remember that you cannot see true UV light directly (it is invisible to humans), you can only see the byproduct of UV, which is visible florescence. You also don’t need to use UV light in order to observe fluorescence, although because UV lies just outside visible light, it is the most commonly used light source to demonstrate fluorescent effects. You can have visible-induced infrared fluorescence (which, the only way to observe that would be to use an infrared camera that can record infrared light), or blue-induced green fluorescence, for example (the latter is actually what a lot of divers use when photographing marine life underwater). Both are possible because you are simply taking a shorter waveform light and converting it to a longer waveform light after it hits an object.
Wavelength Categories
Visible Light is the category of electromagnetic radiation with wavelengths between 400 and 700nm. The common sub-categories of visible light are Red (620-750nm), Orange (590-620nm), Yellow (570-590nm), Green (495-570nm), Blue (450-495nm), and Violet (380-450nm).

After violet, we now exit the visible light category and enter the Ultraviolet category, which is electromagnetic radiation with wavelengths between 10nm and 400nm. The common sub-categories of ultraviolet light are UV-A/longwave (315-400nm), UV-B/midwave (280-315nm), and UV-C/shortwave (100-280nm). There is also “Extreme Ultraviolet” (10-121nm), however I will not be discussing that. All UV categories generate different fluorescent effects depending on the material you are shining it on.
UV Category Descriptions:
UV-A (315-400nm): The type of ultraviolet light I’ll mostly be focusing on in this particular article is UV-A, which is closest to visible light on the electromagnetic spectrum and is the most popular and is the safest UV light to use. Over-exposure to too much UV-A radiation (whether it be short-term or long-term/cumulative) can damage your eyes (especially when looking directly at the light source) and age your skin. UV-A damage is cumulative, meaning you may only see the skin aging later in life. 95% of UV-A from the sun gets past the Earth’s atmosphere.
I’ve found that most UV-A emitting light sources are advertised to peak at 365nm, 368nm, 385nm, 395nm-405nm. Lights advertised to be peaked at 395nm-405nm will most likely emit a lot of visible violet light that will overpower any fluorescent effect you would get from a filtered 365nm peaked light. I would only ever want to use a 395nm light if I was photographing very bright neon material, and even then I would still prefer 365nm.
UV-B (280-315nm): As we continue to shorten the wavelength, rays penetrate the surfaces of material less, but can cause more damage. UV-B is known for causing sunburn and can also damage your eyes. ~5% of UV-B from the sun gets past Earth’s atmosphere. Most standard UV-B light sources are advertised to peak at 302nm, 312nm, or 315nm.
UV-C (100-280nm): UV-C is commonly used to kills micro-organisms, and being near any UV-C light source will damage your eyes, skin, and DNA much faster than UV-B or UV-A if you don’t wear protective clothing to cover all exposed skin and eyes. Using UV-C is dangerous. The unique visual effect that can be obtained with UV-C is that it will turn transparent glass and mirrors into a solid opaque gold color. UV-C is also useful when photographing minerals, as many minerals are much more responsive to UV-C than UV-A or UV-B. 0% of UV-C gets past Earth’s atmosphere. Most standard UV-C light sources I’ve found are advertised to be peaked at 254nm. Below is a photograph taken using shortwave UV-C light.
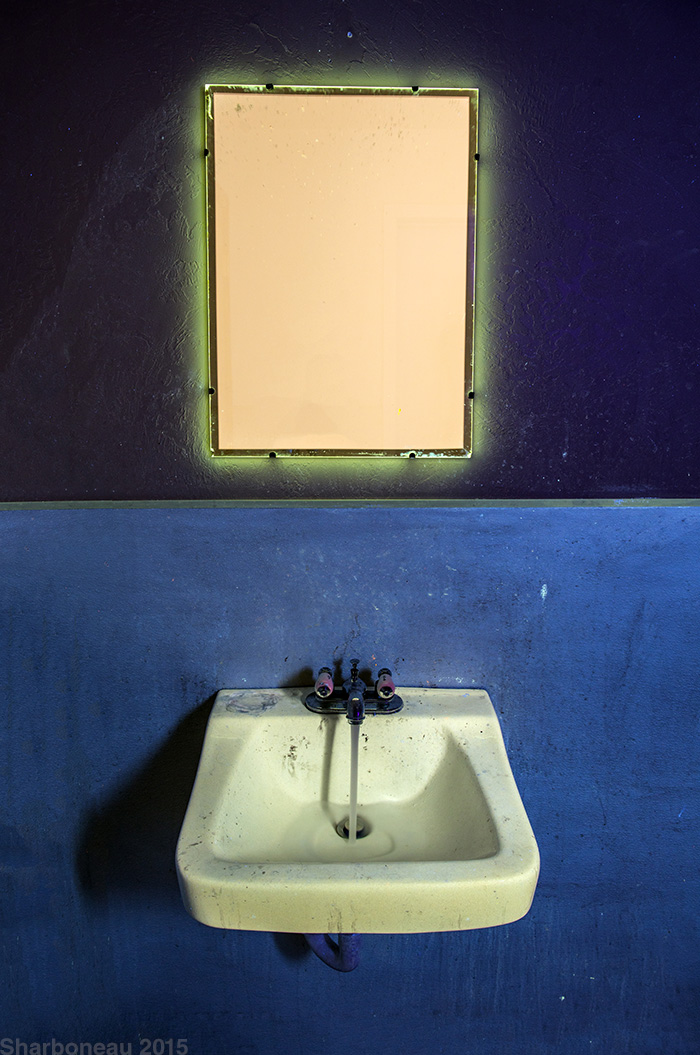
Mirror and sink taken with UV-C light roughly 1-1.5 meter away – f7.1 / 20sec / ISO400
Extreme Ultraviolet (10-121nm): I don’t know if there are any purchasable light sources available that emit extreme ultraviolet, what the visual effects would be, and what safety precautions would need to be in place when using them. Air absorbs extreme UV, so you would have to photograph everything inside a vacuum. If anyone wants to take UVIVF photography to the next level and show us EXTREME Ultraviolet fluorescence, leave a comment and show us! I have not found any examples of extreme UV induced visible fluorescence anywhere online. I do not know for certain if it would even generate visible fluorescent effects considering how short the wavelengths are.
How to Take a UVIVF Photograph
If you want to capture a true ultraviolet-induced visible florescence photograph (per definition) using any camera, you will need to follow every one of these steps:
1. Eliminate all visible ambient light that may be shining onto the object being photographed.
This means that you will need to take pictures in a dark room with no lights on (except your UV light source, of course). If you are taking shots outside, take them at night, ideally without any moonlight, as moonlight emits visible light which can show up in your photo if your camera settings are set to to a sensitive enough setting.
2. Make sure your light source is emitting true UV-only light.
Most cheap blacklights you can find at some store emit some UV-A light and visible violet light. You need to eliminate any visible light in order for your photo to be a true UVIVF photo, per definition – I’ll talk about how to do this later in this article.
3. Eliminate any UV or IR light from being recorded onto the camera’s sensor.
Remember, your eyes cannot see UV or IR light, only visible light, which is the only type of light we want recorded on the camera’s sensor. Your camera sensor, however, can detect/see/record UV, Visible, and Infrared light. Many cameras already have a rectangular UV/IR cut filter directly in front of the camera’s sensor that significantly reduces the amount of UV/IR light transmission, however the amount varies from camera to camera, so in order to guarantee visible-only recorded images, you will need to place a UV/IR cut filter onto your lens.
With that being said, I personally don’t follow these rules strictly.
I break rule 1 if my UV flashlight is powerful enough to over-power the moonlight; if it is, I take photos under the moon after taking a test shot with no UV light just to see how much moonlight is showing up in the exposure. If after taking a test shot I can see anything appear in the exposure, I know that is visible light coming from the moon, so I will shorten the shutter speed, close the aperture, and/or lower the ISO number then take another test shot until I can no longer see any moonlight show up in the exposure.
I break rule 2 when I want to add in other forms of light (usually visible light) to create a more interesting-looking image. You can still take images with popular blacklights that emit both ultraviolet and visible violet, there is nothing better or worse about doing this, it just doesn’t qualify to be a true UVIVF photograph per definition. You can still see interesting fluorescent effects even when violet light is present and it can sometimes look even more aesthetically pleasing than a pure UVIVF photo, it just depends on what you want to do. Having a UV-only light source, however, will usually give you the most contrasty fluorescent effects possible.
I break rule 3 because the UV/IR cut filter that is already pre-installed in front of my camera’s sensor seems to do a good job at blocking out most UV/IR frequencies, and am personally satisfied with the results. I’d also break this rule if I wanted to experiment with recording UV and IR light onto the sensor. UV LEDs made by Nichia do not emit IR light, so you don’t have to worry about filtering out IR from your lens or at the light source itself when using them like you do with other lights.
“What camera and camera settings need to be used?”
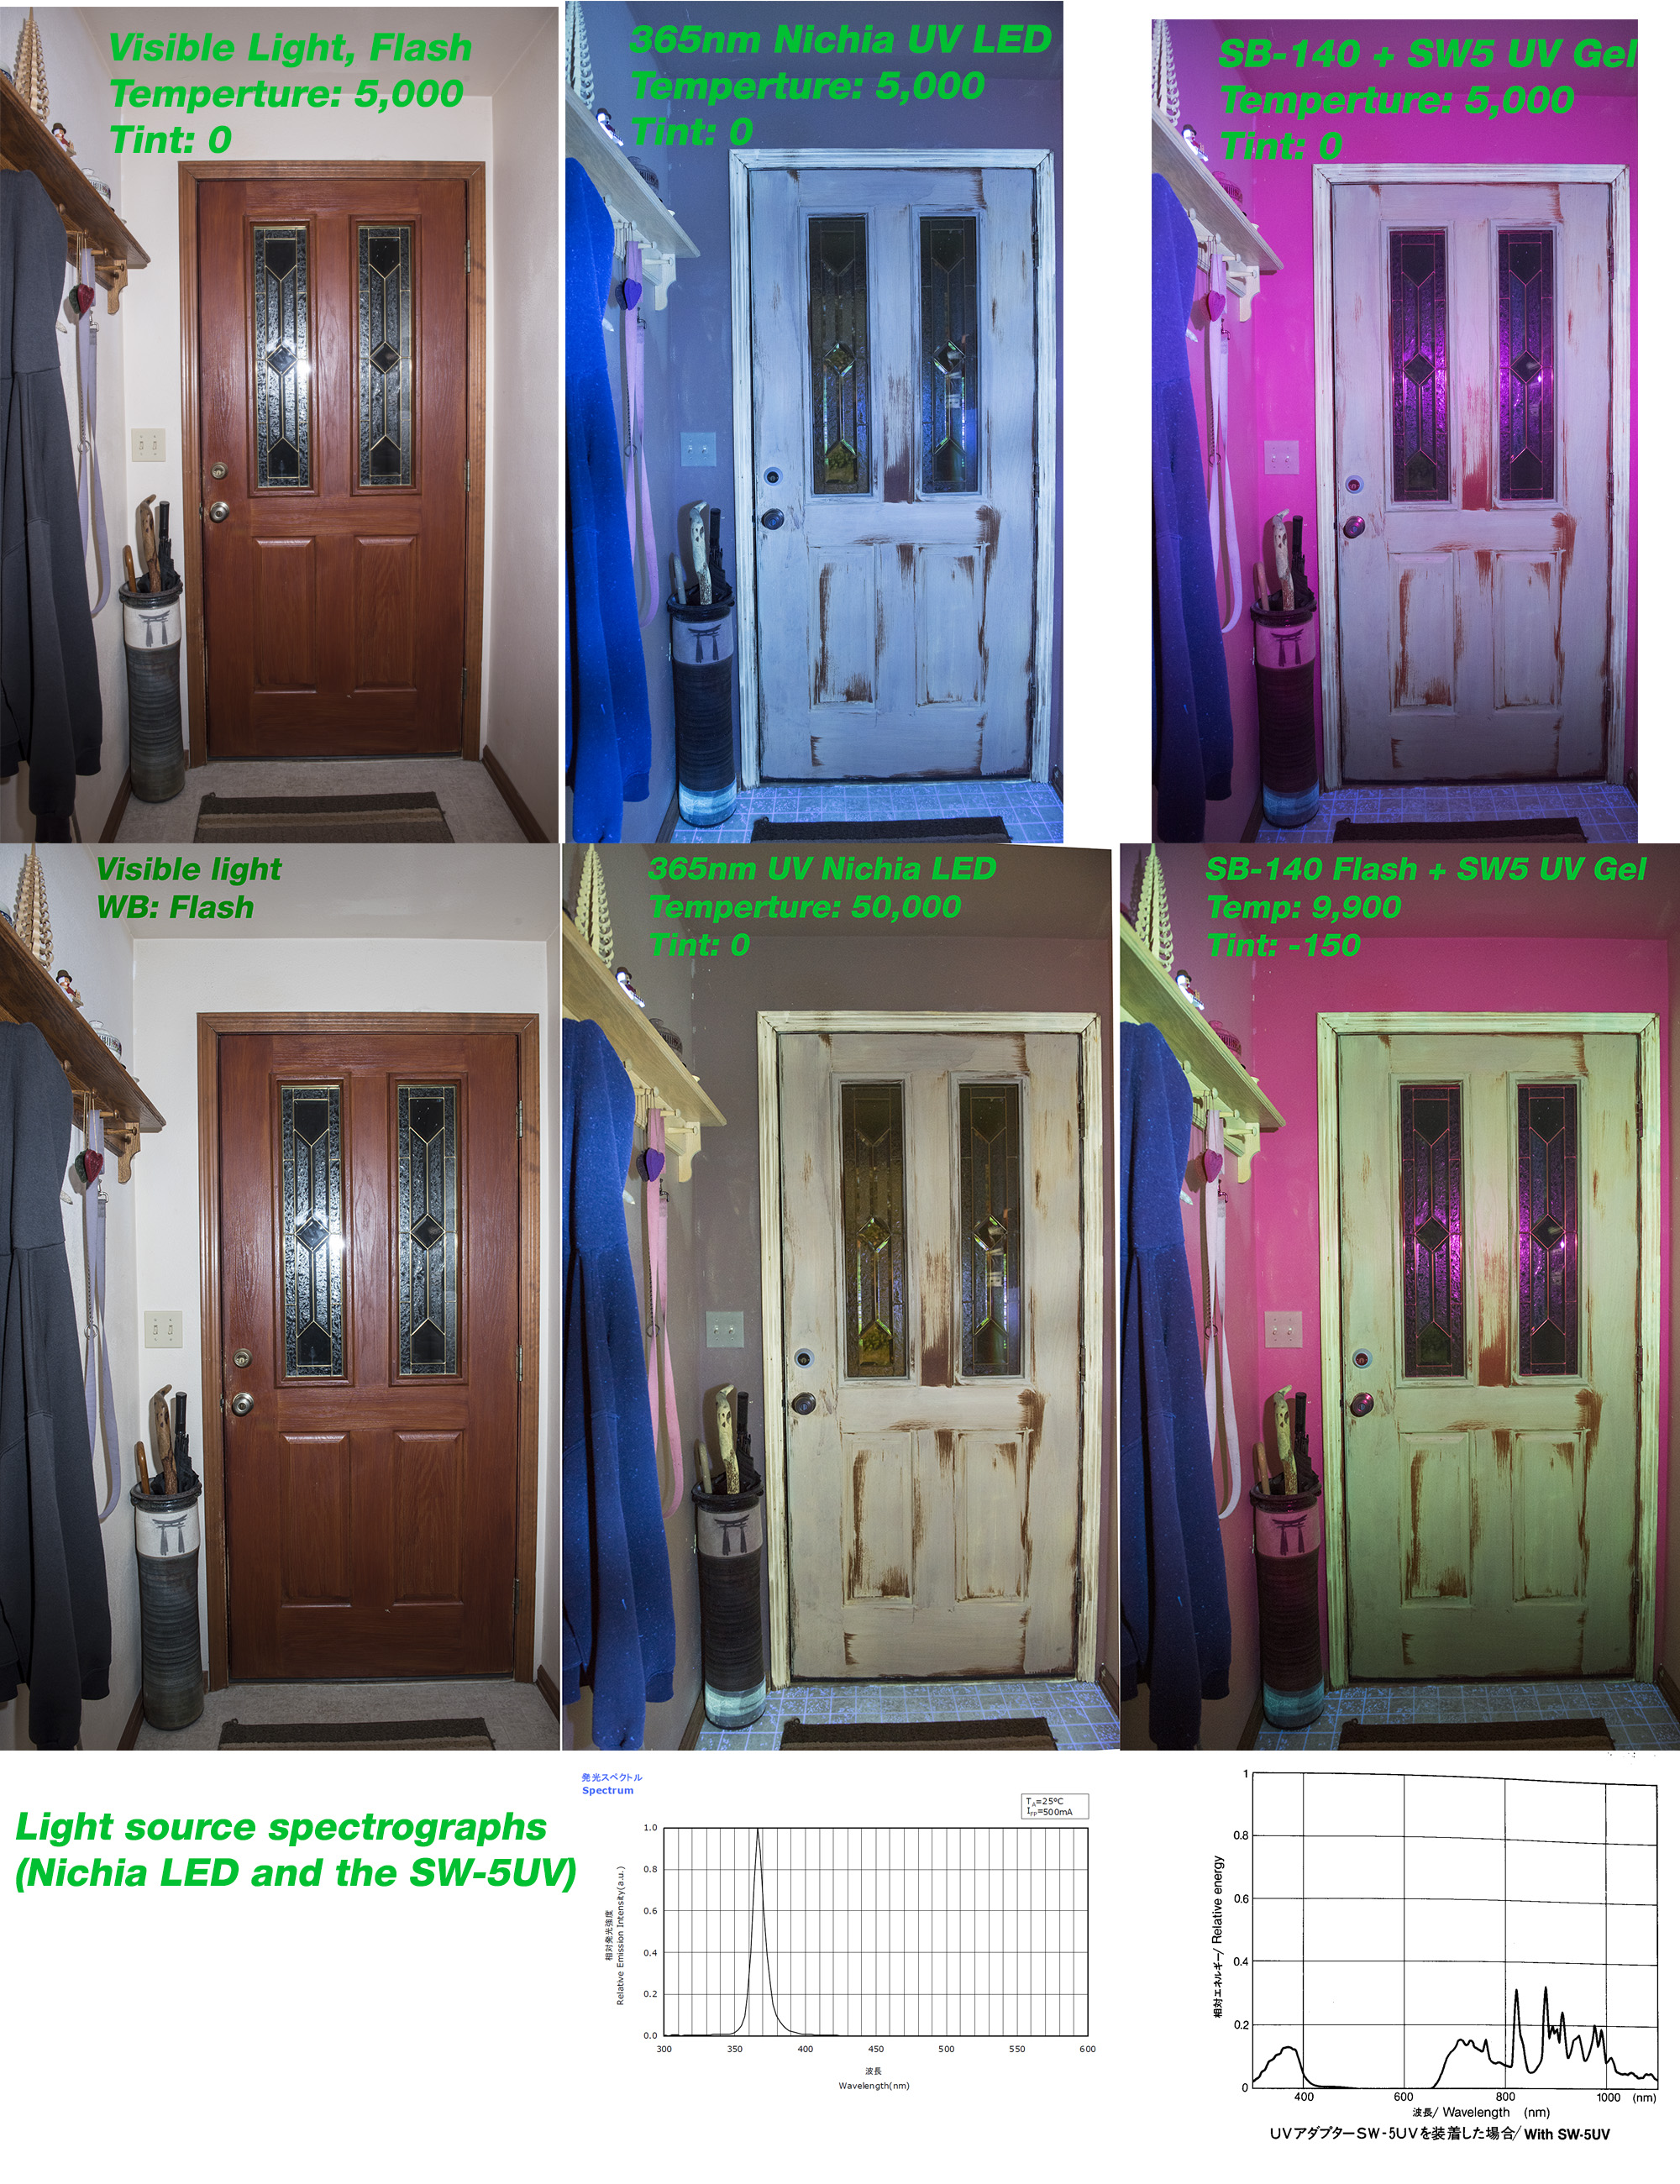
You can use any camera you want to take a UVIVF photo. Cellphone, SLR, DSLR, GoPro, pocket camera, whatever. I use DSLRs because I can change lenses and can change the aperture, shutter speed, ISO, focus, and White Balance to anything I want. Using Manual Mode on your DSLR would probably be the most ideal mode to be in for UVIVF photography. For the white balance, that is up to you. I personally usually set it to Daylight/5,000k (this will give you photos that have a blue cast to them, which is one standard to use) or the warmest possible setting, which is 10,000k on my Nikon D810 DSLR (this will remove more of the overall blue overcast to the image and tends to maximize color diversity and is usually what I use). Shade also works fine.
I’d recommend shooting in RAW format so you can post-process the images without degrading the images as quickly, and to be able to change the white balance to anything you want (you can even change it above 10,000k). You could also make the argument that having a camera with good low-light capability would be ideal, because UV light sources tend to not be very bright at all, so you tend to be using high ISO numbers; the Nikon D5 would probably be the best option available that would produce very high quality images when raising the ISO number to greater numbers.
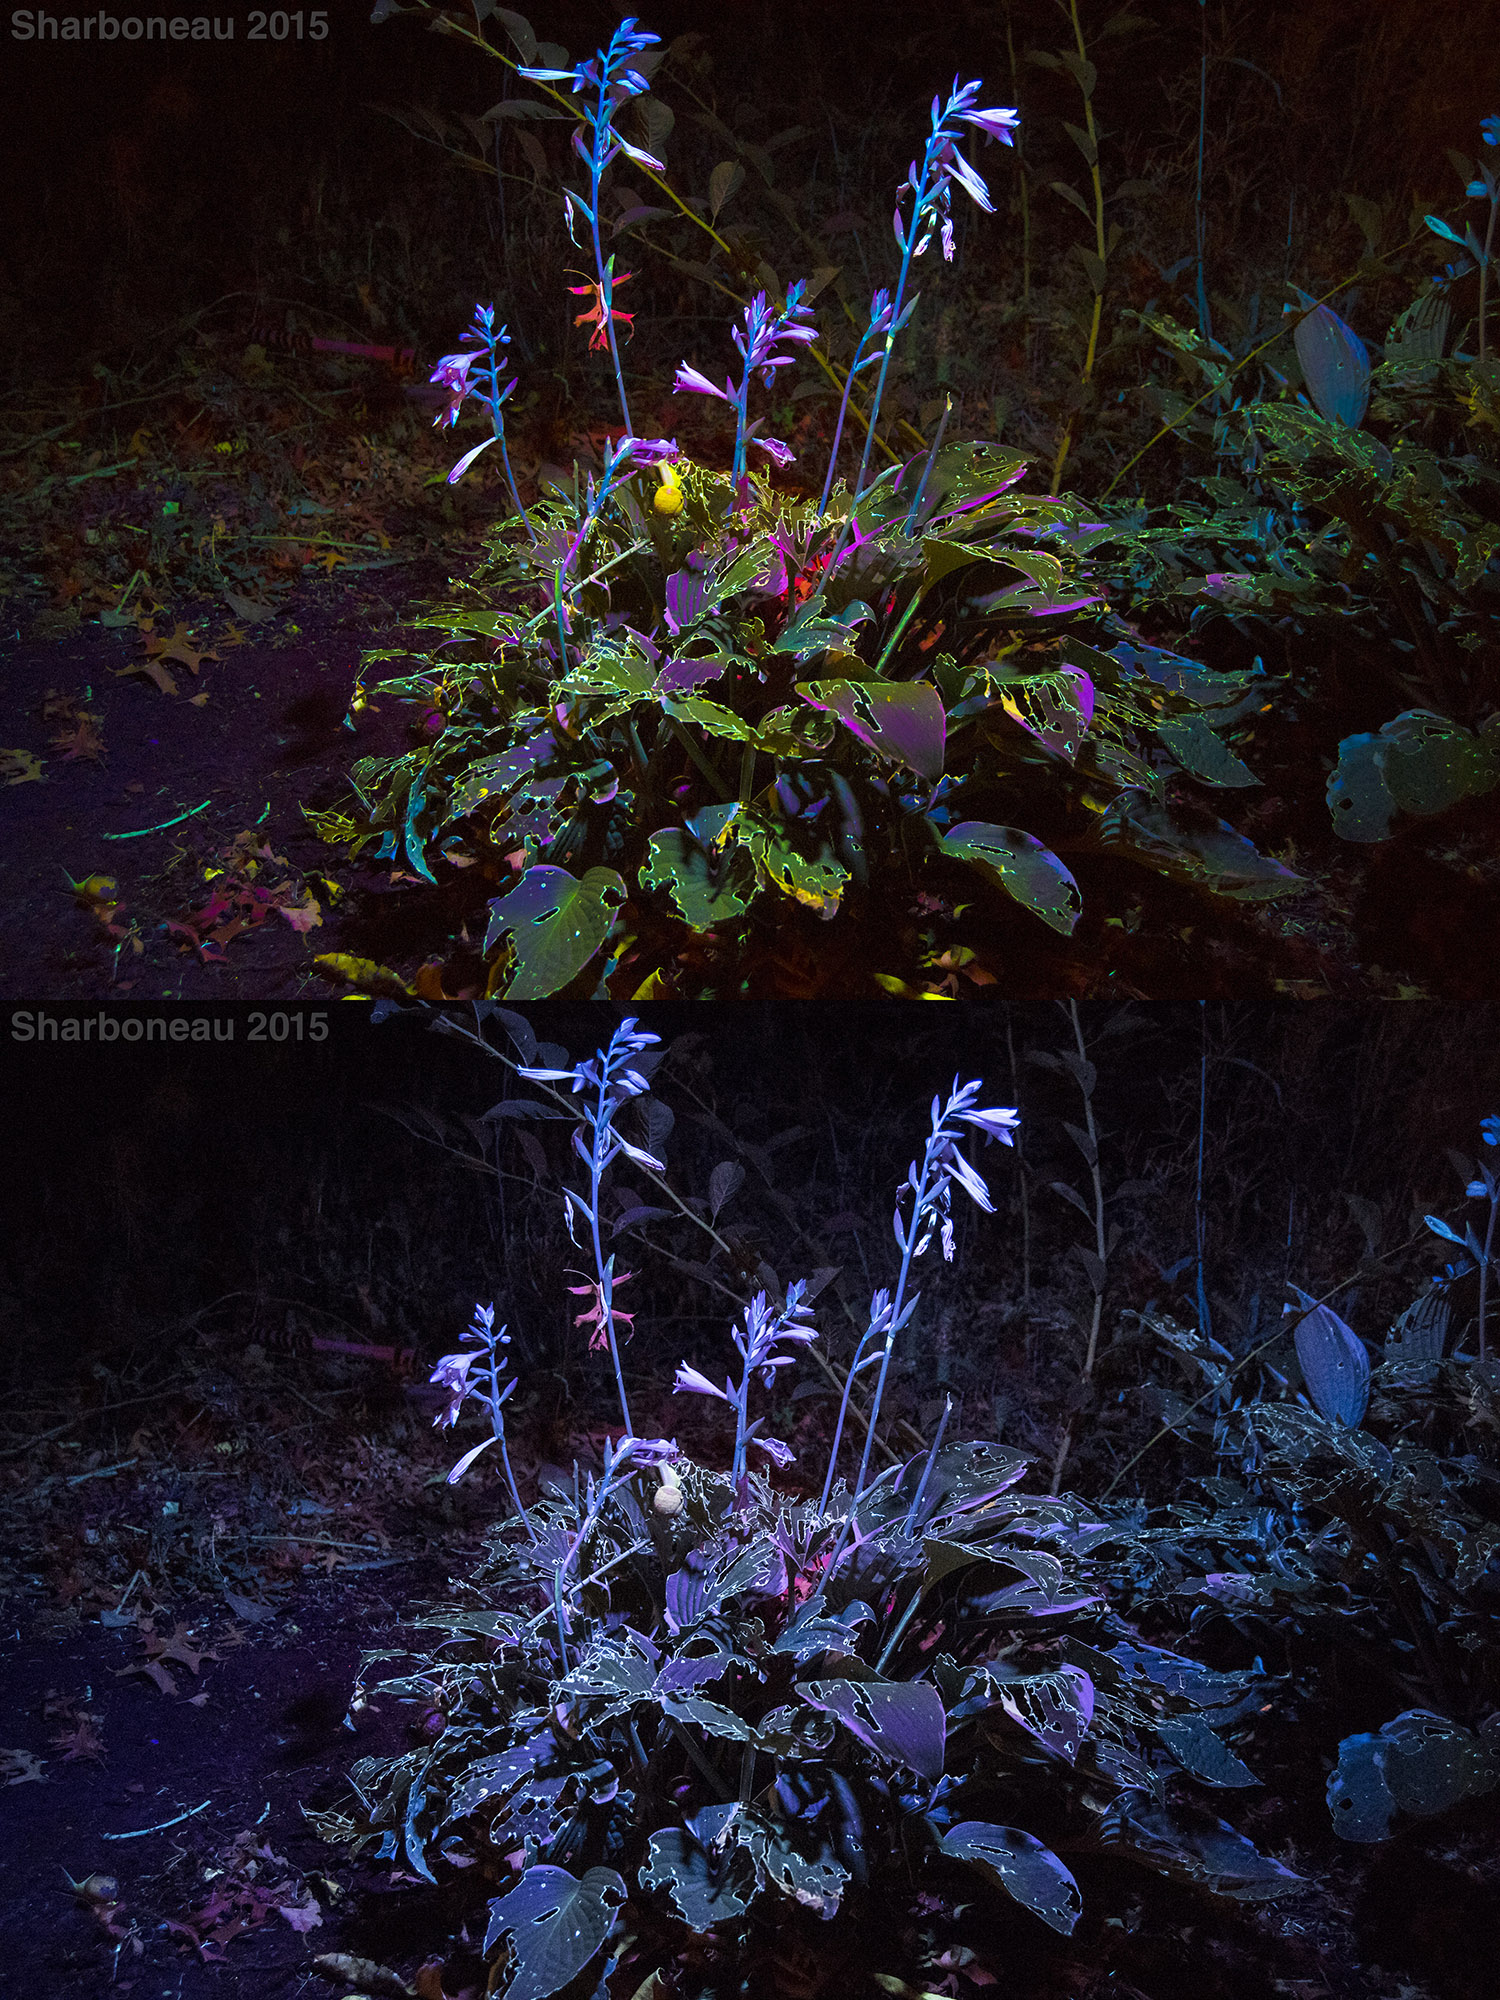
Here are two photographs showing two different white balance standards I use. The top image has a warmer custom white balance (~10,000K), while the bottom image has the white balance set to Daylight (~5,000K). I believe this photograph was shot using an SB-140 flash with its included UV filter, which does emit some violet light. Can you spot the two snails in the image?
Safety
WARNING: Short-term/long-term overexposure to ultraviolet radiation can contribute to causing sunburn, health problems, skin cancer, premature aging of the skin, eye damage, DNA damage, immune system suppression, etc. As a photographer, your eyes are very important, you don’t want to damage them, shorten their lifespan, or get cataracts, so always wear proper eye protection whenever using UV lights. You also have to mindful of the things you photograph. Never look directly into a UV light source without proper eye protection and never shine a UV light into another person’s eyes directly.
Eye protection
Some prescription glasses and contact lenses you may already be wearing may be advertised to block UV-A and UV-B, but I’ve found that for many glasses and contacts, the percentage of UV blocked usually isn’t that much, light can still get through the sides, and if wearing contact lenses, light can still hit the white part of the eye.
 The best solution for eye protection would be to wear UV Blocking safety glasses, goggles, or a face-shield that blocks 99%+ of UVA, UVB, and UVC rays. I like goggles the most because you don’t have to worry about them falling off, they fit over prescription glasses, and light cannot enter in through the sides, so you are totally protected. I use the UVP face shield when working with UVB or UVC rays.
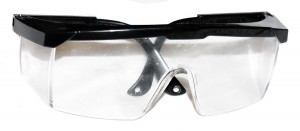
You can also get a cheap pair of orange safety glasses that block blue+violet visible light (which can also be potentially harmful to your eyes as well, believe it or not), in addition to UVA/B/C, and I recommend everyone wearing these after sundown to help with sleep, however when photographing things, you may prefer to see in full color when taking shots at night, and in that case, the goggles by UVP would be the best possible solution. The orange glasses fluoresce/glow bright orange when UV light is shined directly onto them.
If you want to test any safety glasses or goggles you may already have to see if they block UV rays, you can take a UV LED light source (or any other light source you are using, so long as it exclusively emits UV light and no visible light) and place it directly up to the glasses and turn it on. If you can see anything illuminate out the other side, then that means that material is fluorescing. Fluorescence would only be happening if UV light is passing through the glasses before hitting the object. If the material you are aiming the light at is fluorescing very dimly, then that means that the glasses are blocking most of the UV rays and its up to you if you want to use them or not. If nothing comes out the other side, then awesome, that means your glasses are doing a very good job at blocking ultraviolet light/radiation/photons/rays/waves/energy.
Skin Protection
Pants and long sleeves are ideal when using UV LEDs or flashes. For extra protection, you can use sun protective clothing. You could use a balaclava for your head in addition to gloves for even more protection.
Zinc Oxide sunscreen lotion is the best kind of sunblock for protecting against UV-A and UV-B rays and I would apply it to any model if you will be shining UV-A lights directly on them repeatedly over an extended period of time (I would never use UV-B or UV-C on a model). Any exposed skin (including eye lids and lips) should have sunscreen applied. Application of sunscreen to the upper and lower eyelids and eye rim is complicated by trying to avoid inadvertently rubbing it into the eye, so you may prefer to have your model wear safety glasses instead or limit the amount of shots taken. You can use powdered sunscreen on the scalp instead of lotion if you want a cleaner look, as lotion does not mix well with hair. Take shots with their eyes either closed or with a protective UV-Blocking material over their eyes.
If using UV-B or UV-C light sources, all exposed skin is required to be completely covered with dense/thick material, including your hands, neck, feet, face, arms, legs, etc. – everything. I personally wear shoes, gloves, the LEAGY head balaclava, a beanie, and pants/sweatshirt/scarf (basically two layers of clothing for upper and lower body) and a UVP Face Shield that blocks UVA, UVB, and UVC rays when working with UVB or UVC rays. Do not use UVB or UVC when around pets or other people that may look at the light or be near it without wearing proper skin and eye protection.
General UV Resistance
Astaxanthin is a supplement you can take orally that is said to increase the immunity of the negative effects associated with UV exposure (skin aging, etc). If you want an extra kick of UV protection, take one everyday for 2 weeks for it to first build up in your system. I would not recommend using Astaxanthin as a replacement to the other types of protection, only as an additional form of protection, although you can do what you want. This article talks more about supplements used for UV-damage immunity.
Ultraviolet Light Sources
Okay, now that safety is out of the way, I’m now going to share different types of ultraviolet light sources with you here. Some UV light sources on this page can roughly emit at least twice as much UV radiation that you would receive from continuous direct sunlight. Flashes blast out even more than that, but the exposure time lasts only a fraction of a second.
Inexpensive/Common/Everyday “Blacklight” Solutions

The $1-$15 standard screw-in tungsten light bulbs advertised as blacklights that can be found in hardware stores don’t emit any usable amount of UV, they basically are just violet light bulbs and are not at all useful for UVIVF photography.
The common screw-in blacklight fluorescent bulbs by General Electric that are next to the tungsten ones emit some UV-A and some violet light, meaning you can actually see some mild fluorescent glow effects from these. An even better solution, however, is a larger bulb by American DJ for $20, which is brighter and has a better ratio of ultraviolet:violet when compared to the screw-in bulb – this isn’t a bad solution if you are looking for a cheap blacklight. They also make a 48″ version.
Next up is the idea of inexpensive UV LEDs, which have the most potential. Right now, a high quality UV LED is probably going to cost you more than $100. UV LED torches that cost ~$1-$100 are usually peaked at 395nm and emit a lot of violet light. The peak wavelength specifications of these UV LEDs that are being sold on eBay, Amazon, and other sites for $1-$100 are often unreliable. LEDs specified/advertised as “365nm” or just as a “UV LED” often emit a large amount of visible light, and some even act similarly to the tungsten lightbulb by GE (ie. emit no useful amount of UV). The ones advertised to be peaked at 365nm (specifically ones made by Nichia) are the ones you want to go after and are probably going to be $100 or more. I’ll talk about those in a bit.
That’s all I have to say about the common everyday black-lights. The bottom line is that these lights can be used to get decent results if you are photographing material that fluoresces very brightly, specifically the one by American DJ. However, if you are photographing material that does not fluoresce very bright, or want to eliminate the violet light completely, you need a true, high quality UV light source that emits no visible violet light. Read below if that is you.
Flashes (speedlights and studio strobes modded to emit UV-Only light)
Portable speedlights are my favorite – you can literally mount one on top your camera, go outside at night hand-holding your camera with the shutter speed set to 1/250th of a second, and take pictures of all sorts of stuff very efficiently without having to worry about motion blur or lugging around tripods! The only downside is that you will probably need to use high ISO numbers when photographing things that glow more subtly, such as biological material. Think ~ISO3200-ISO12800 @ ~F2.8-F5.6. Material that fluoresces brightly will be no problem – you can use lower ISO numbers and smaller apertures for that.
Many xenon flashes, whether it is a strobe or portable speedlight, will have UV-Blocking material either coated on the flash bulb itself or on the plastic Fresnel lens that protects the bulb, so we need to mod the flash by removing the Fresnel lens or remove any uv-blocking coating that might be on the bulb itself, and then filter the light so only UV light gets emitted. If you are using a powerful studio strobe that has UV-blocking coating on the bulb, you could potentially replace that bulb with a bulb that doesn’t have any UV-blocking coating on it and then filter it with one of the filters mentioned later on in this article, and then you’d have a bright UV-only light source that could be used for high quality UVIVF photography, where using lower ISO numbers and smaller apertures would be possible. Filtering any strobe could potentially be challenging and cost more money if you will be using a larger piece of filter glass.
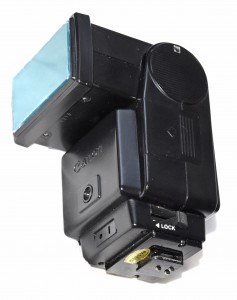 My UV flash of choice, however, is the small and portable Canon 199A
. You will need to mod the unit by removing the Fresnel lens. After that, tape the reflector underneath the black plastic of the flash to stop it from popping out. After that, you need to filter it so only UV light gets emitted. The Canon 199A should come with a detachable black rectangular frame with a diffuser in it. Pop the diffuser out of the black rectangular frame and replace it with uviroptics’ Canon 199A UV Filter Set
, then slide the rectangular black frame onto the flash and BAM! You have yourself a UV-only flash! You could also just tape the filter to the front of the unit as well, if you don’t have the plastic rectangular frame.
If the uviroptics filter for the 199A is temporarily unavailable/unlisted/out-of-stock, you can either send him a message, wait until it is re-listed, or filter the flash with a Baader-U filter screwed at the end of a step-down ring set instead – just wedge the funnel of step rings on the end of the flash and it will stay. Insert some black foam in the back or tape up the opening if you want to stop light from coming out the back end of the funnel, as this is important.
Make sure the switch on your 199A is set to white, as you will always want the flash to fire at full power. The voltage is at 5 volts by the way, so you don’t have to worry about this old flash frying your camera; all Canon and Nikon DSLRs can handle 5V. The filter set comes with two filters; I sometimes like using just the U-340 alone if I am going after a certain look where there is just a bit of red/infrared added to the image. If you use both filters together, it is a good idea to tape them together on the edges using clear Scotch tape before putting it in the black rectangular frame.
I should note once more that if you are going to be photographing things with this flash that don’t fluoresce extremely bright, such as organic/biological material (leafs, rocks, or moss), that you should start out with your camera set to ISO 3200, f5.6, and 1/160th sec. and then adjust the exposure settings up or down according to what you are seeing in the preview screen.
Alternative strobes and speedlights that can be used for emitting UV radiation:
-
-
- Quantum QFlash + QF80 adapter that accepts regular screw-on filters in front of the bulb. This flash is the only flash I am aware of that is currently being manufactured specifically designed for UV/VIS/IR photography. Brightest portable flash available and because of the omnidirectional light bulb that sticks out, it can be used with light modifiers such as softboxes, but the unit looks cumbersome. Guide number is 160(!) or 320(!!) with tele reflector. $600-$1300.
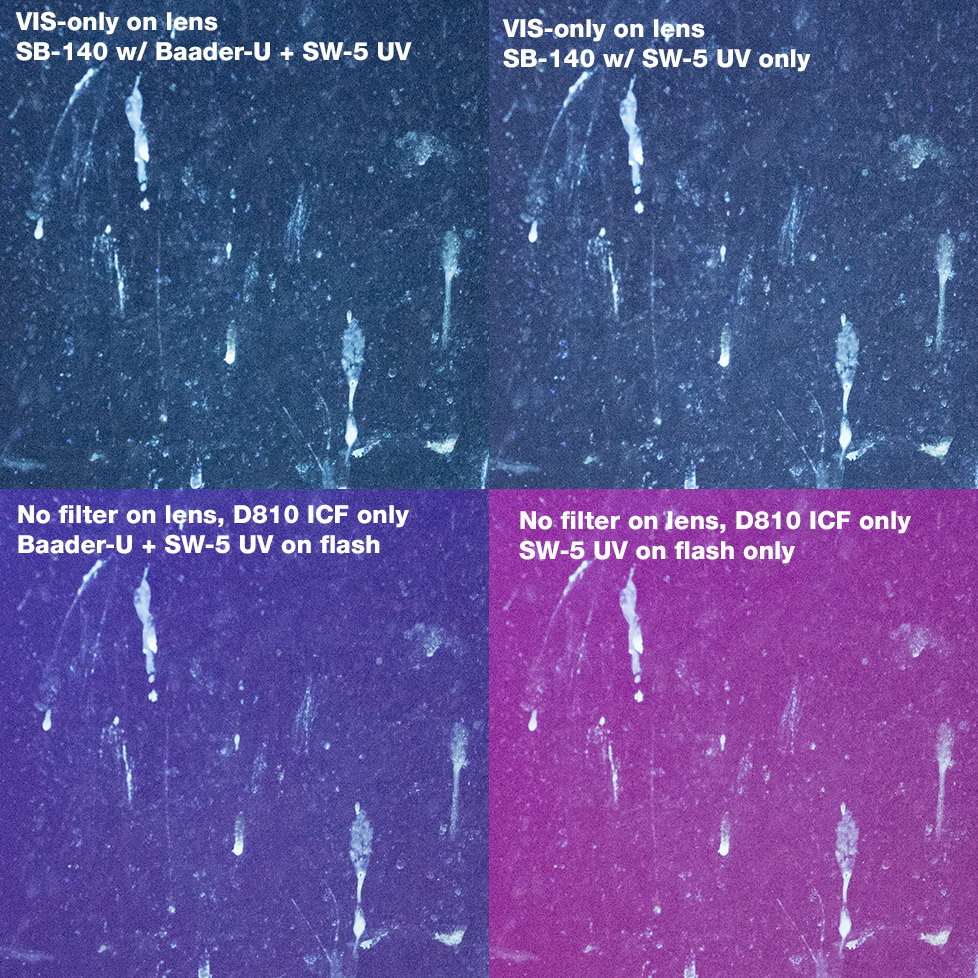
- Nikon SB-140, rare, old, full-spectrum flash that emits UV, VIS, and IR light that doesn’t need to be modded. Comes with UV/VIS/IR filters, but the UV filter is not a true UV-only filter, it leaks some violet VIS and a ton of IR but produces fair UVIVF results when an IR/UV cut filter is on the camera lens. The VIS filter is not a true VIS filter, it is actually VIS+IR. Even the IR filter leaks some VIS too, I think. Unit is cumbersome but can apparently work with the smaller Nikon SD-8 battery pack. PC-Sync port only, no hotshoe. I had a hard time getting it to work with wireless triggers. This flash is indeed brighter than the Canon 199A, but because of the price, the false filters, and how rare it is, I wouldn’t waste your time with this flash and would just get the QFlash, unless you like the idea of owning a collectors item. I want to sell mine; if you want it, send me an email. ~$2000. trig voltage >5v. Unit is 1-3 stops more powerful than the 199A, although I will have to test it again to confirm. Here it is being tested against a 365nm Nichia UV LED, shot with a Nikon D810 with no UV/IR cut filter on lens.
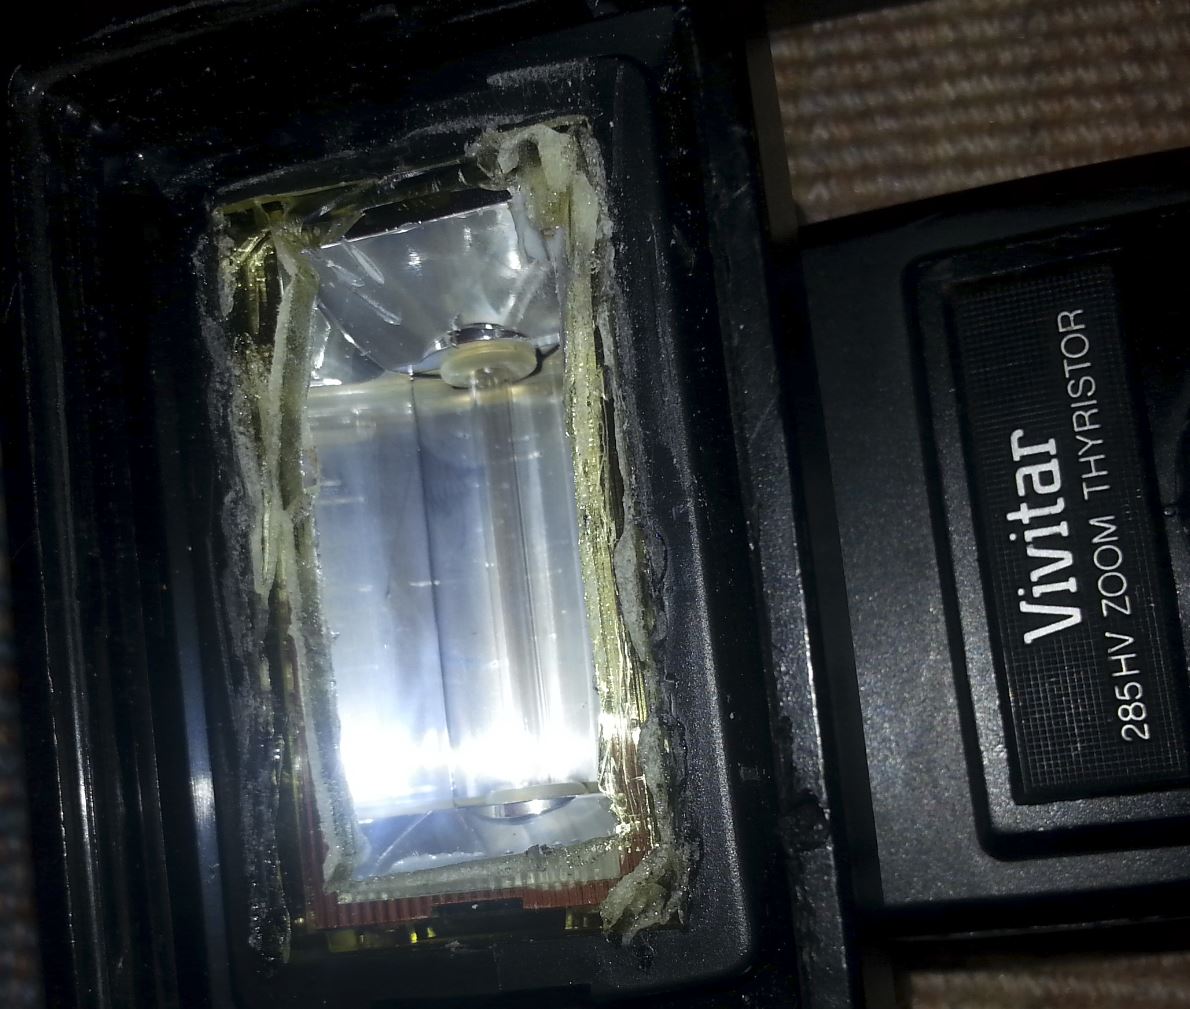
- Vivitar 285HV, Regular speedlight with hotshoe. Needs to be modded, however a faster mod would be to just get a hot cutting knife and cut out a large portion out of the freshnel lens, then tape a rectangular UV filter stack over the cut hole. Similar units are the Vivitar 283 or 285. ~$60. The power output level looks the same when compared to the Canon 199A.
- Metz Mecablitz 45 CT-1, Freshnel lens needs to be removed, then filtered. Emcumberment is not high like the the SB-140, but not low like the Canon 199A or Vivitar 285HV. According to one report, this flash is not as bright as the Canon 199A, but I have not tested or confirmed this. The old 45CT1 is listed on botzilla.com as having a trigger voltage up at 600v, though someone else said they measured it at 163v. The newer 45CL1 apparently has lower trigger voltage. $20-$100.
- Broncolor Pulso + UV attachment. Studio strobe. $400 used + $1600 special order for UV attachment.
- Bowens 500R, Bowens 1500Pro (untested but most likely to work because they use the same tubes) and all other Bowens R series and Pro series with uncoated flash tubes. All these units come factory equipped with coated tubes, which are not so good for UV photography. Uncoated tubes must be ordered as replacement parts/accessories from Bowens, and can be installed by the user.
- Paul C Buff Einstein E640 Studio Strobe, ideally used with the front UV-coated bulbous glass element detached + uv-only filter. $500. Strobe does emit UV+VIS light completely unmodifed. Guide number is 219 with 7″ reflector. Paul C Buff does sell Alien Bee and White Lightning strobes as well, and they do have non-uv-blocking bulbs for them but you need to call them to order them separately. The Einstein apparently has UV-Blocking coating on the bulb, however I have tested it and UV still gets through it. Ideally, I would want to filter my E640 strobes with a dome-shaped UV-only filter that attaches in front of the flashbulb. Not sure how this could be done – if you do, post your solution in the comments.
- Metz 60, one of the brightest available speedlights but I am not sure if or how easy it is to modify for UV…. $100
- Quantum QFlash + QF80 adapter that accepts regular screw-on filters in front of the bulb. This flash is the only flash I am aware of that is currently being manufactured specifically designed for UV/VIS/IR photography. Brightest portable flash available and because of the omnidirectional light bulb that sticks out, it can be used with light modifiers such as softboxes, but the unit looks cumbersome. Guide number is 160(!) or 320(!!) with tele reflector. $600-$1300.
-
Nichia UV LEDs
UV LED chips manufactured by Nichia are very high quality. These LEDs produce some visible violet light, but the visible light they do produce can be eliminated completely by placing a Hoya U-340 filter in front of the light source. Here is a list of torches that use 365nm Nichia UV LED chips:
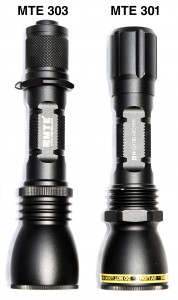 $265 – MTE 303 – This uses a powerful 365nm UV Nichia NVSU233A U365 diode, approximately 1030mw of UV LED Power. The 365nm U-303 is the most powerful 365nm UV flashlight I am aware of. You will want to filter it using a 37mm Hoya U-340 filter. An MTE torch or a modded Canon 199A flash is what I recommend to most people who want to start/experiment with UVIVF photography.
$225 – MTE 301 – This uses the a 365nm UV Nichia NCSU033B diode, approximately 658mw of UV LED Power. I own the UK version of this torch which is called the “NightSearcher” and have replaced the clear filter that comes included with the torch with a 37mm U-340 filter to eliminate the little amount of visible light it does put out – the same filter can and should be placed inside the 303. The MTE 301 produces a bright hotspot in the middle of the beam, however the 303 produces a larger gradual hotspot. The 303 produces more visible violet light, so you should definitely filter it. Unscrewing the body off from the cap with wrenches on the square and hexagon parts of the metal casing will remove the head entirely and reveal the exposed LED chip, this will widen the beam and remove the hotspot entirely. I believe the 301 LED outputs roughly twice the amount of UV radiation than direct sunlight does when measured from ~10″ away.
If you are in a different country than the US and are trying to order a torch manufactured by MTE, go here.
$616 – Higher Orbit’s Hoplite365 UV LED torch, uses Nichia NCSU033B diode (same as the MTE 301 at 658mw) and comes with a VIS-Blocking filter already on the front, and is waterproof. I personally would not use this due to the price, unless you are using it underwater.
 $100+ – Other 365nm Nichia LEDs on Amazon – I have purchased one of these (the small titanium gray unit) and it has a phosphorescence power button on the back and a phosphorescence ring around the front of the unit that both glow green when exposed to UV light. About the same power as the MTE 301 and has a larger, gradual hotspot. The unit can fit in your pocket easier because of its small, minimalistic design. Didn’t come with a battery. Uses same battery as the MTE 301/303. Emits violet light just like the 301/303. If you want to filter it, you would need to tape or glue a smaller glass-only U-340 filter on the outside of the unit (ask ebay seller uviroptics), and the filter can’t be installed directly into the torch like it can in the MTE 301/303. Overall this torch is excellent, and is a cheaper alternative to the MTE torch. Filtering it is cheaper too.
$??? – ????????? – This torch would use the Nichia NVSU333A chip, which is currently the brightest Nichia chip at 3,640mW of power. I know of no LED torches that use this chip – if you do, please let us know the name of it in the comments. It would probably need to be cooled using fans. Once these powerful chips start being put into actual torches you can purchase, these torches will be the coolest thing ever because a brighter torch will enable a photographer to light paint entire landscapes and trees using ultraviolet light and photograph practically anything more efficiently.
Way Too Cool and UVP
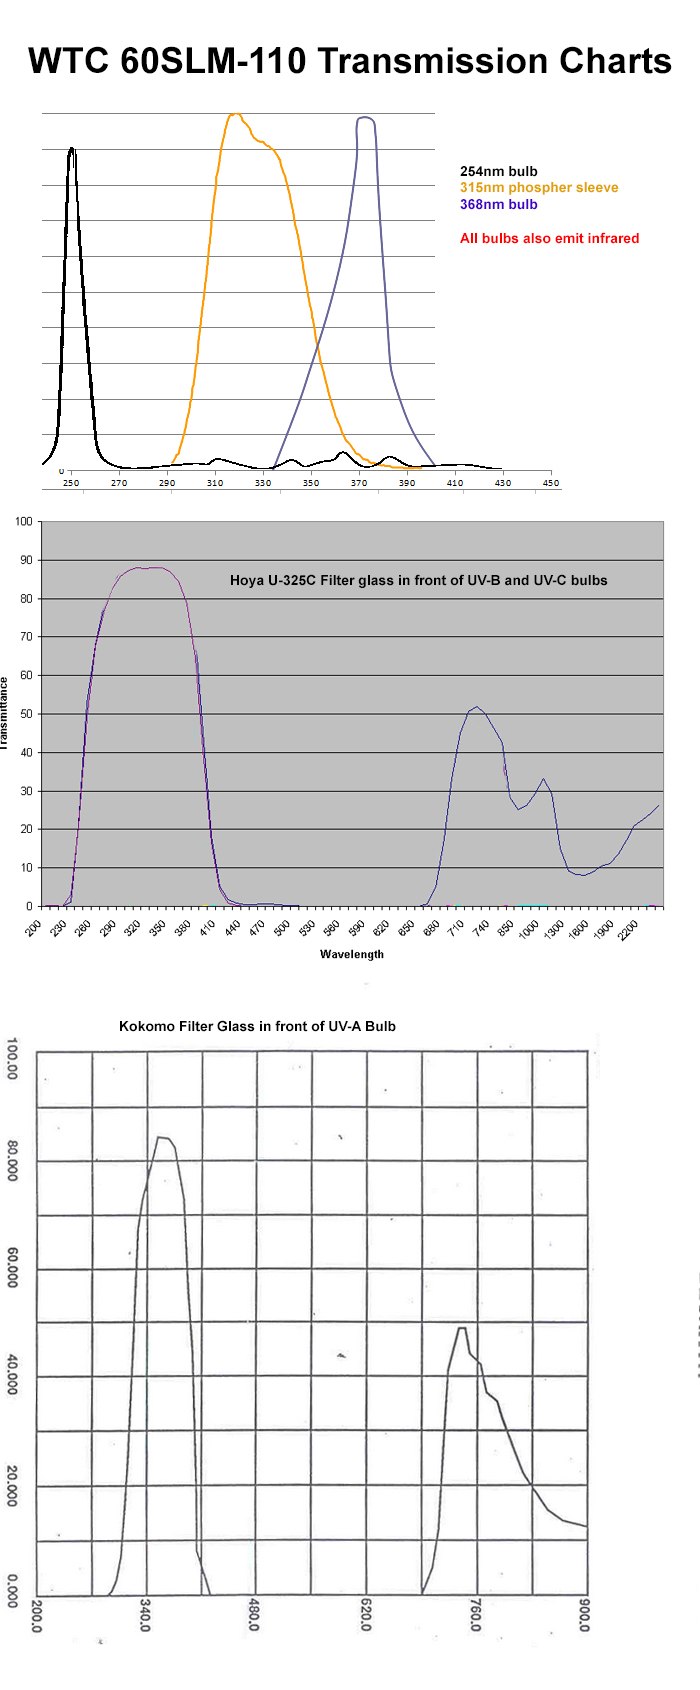
UV light fixtures manufactured by Way Too Cool is what I would recommend if you want to experiment using UV-B and UV-C. The UV-A 368nm bulbs they use look just like a filtered 365nm Nichia LED or a filtered flash. The only downside about these lights when compared to a UV LED or a portable flash is that they are larger, some are heavy, and all of them need to be plugged into an electrical outlet or a large battery, and there is no 1/4″ tripod screw hole on any of the units, so they cannot be properly mounted to light stands unless you mod them yourself or hang them using the hooks. UV-B and UV-C is also more of a pain to work with due to the extra safety precautions that must be in place. The lights do emit IR. The UV-C bulbs Way Too Cool uses do not produce ozone. The light I’ve experimented with is the WTC 60SLM-110, which is a bit heavy and takes a few seconds to warm up. Here are the transmission charts for that unit that I compiled after asking. Way Too Cool’s official website is https://www.fluorescents.com/
The company UVP also makes ultraviolet light sources. The Blak-Ray B-100 AP plugs into the wall and has about the same amount of light output as the MTE-301 LED torch – it can be purchased used on eBay for about $150. I strongly prefer the MTE over the Blak-Ray though. UltravioletPhotography.com has discussed the B-100 AP light in more detail here.
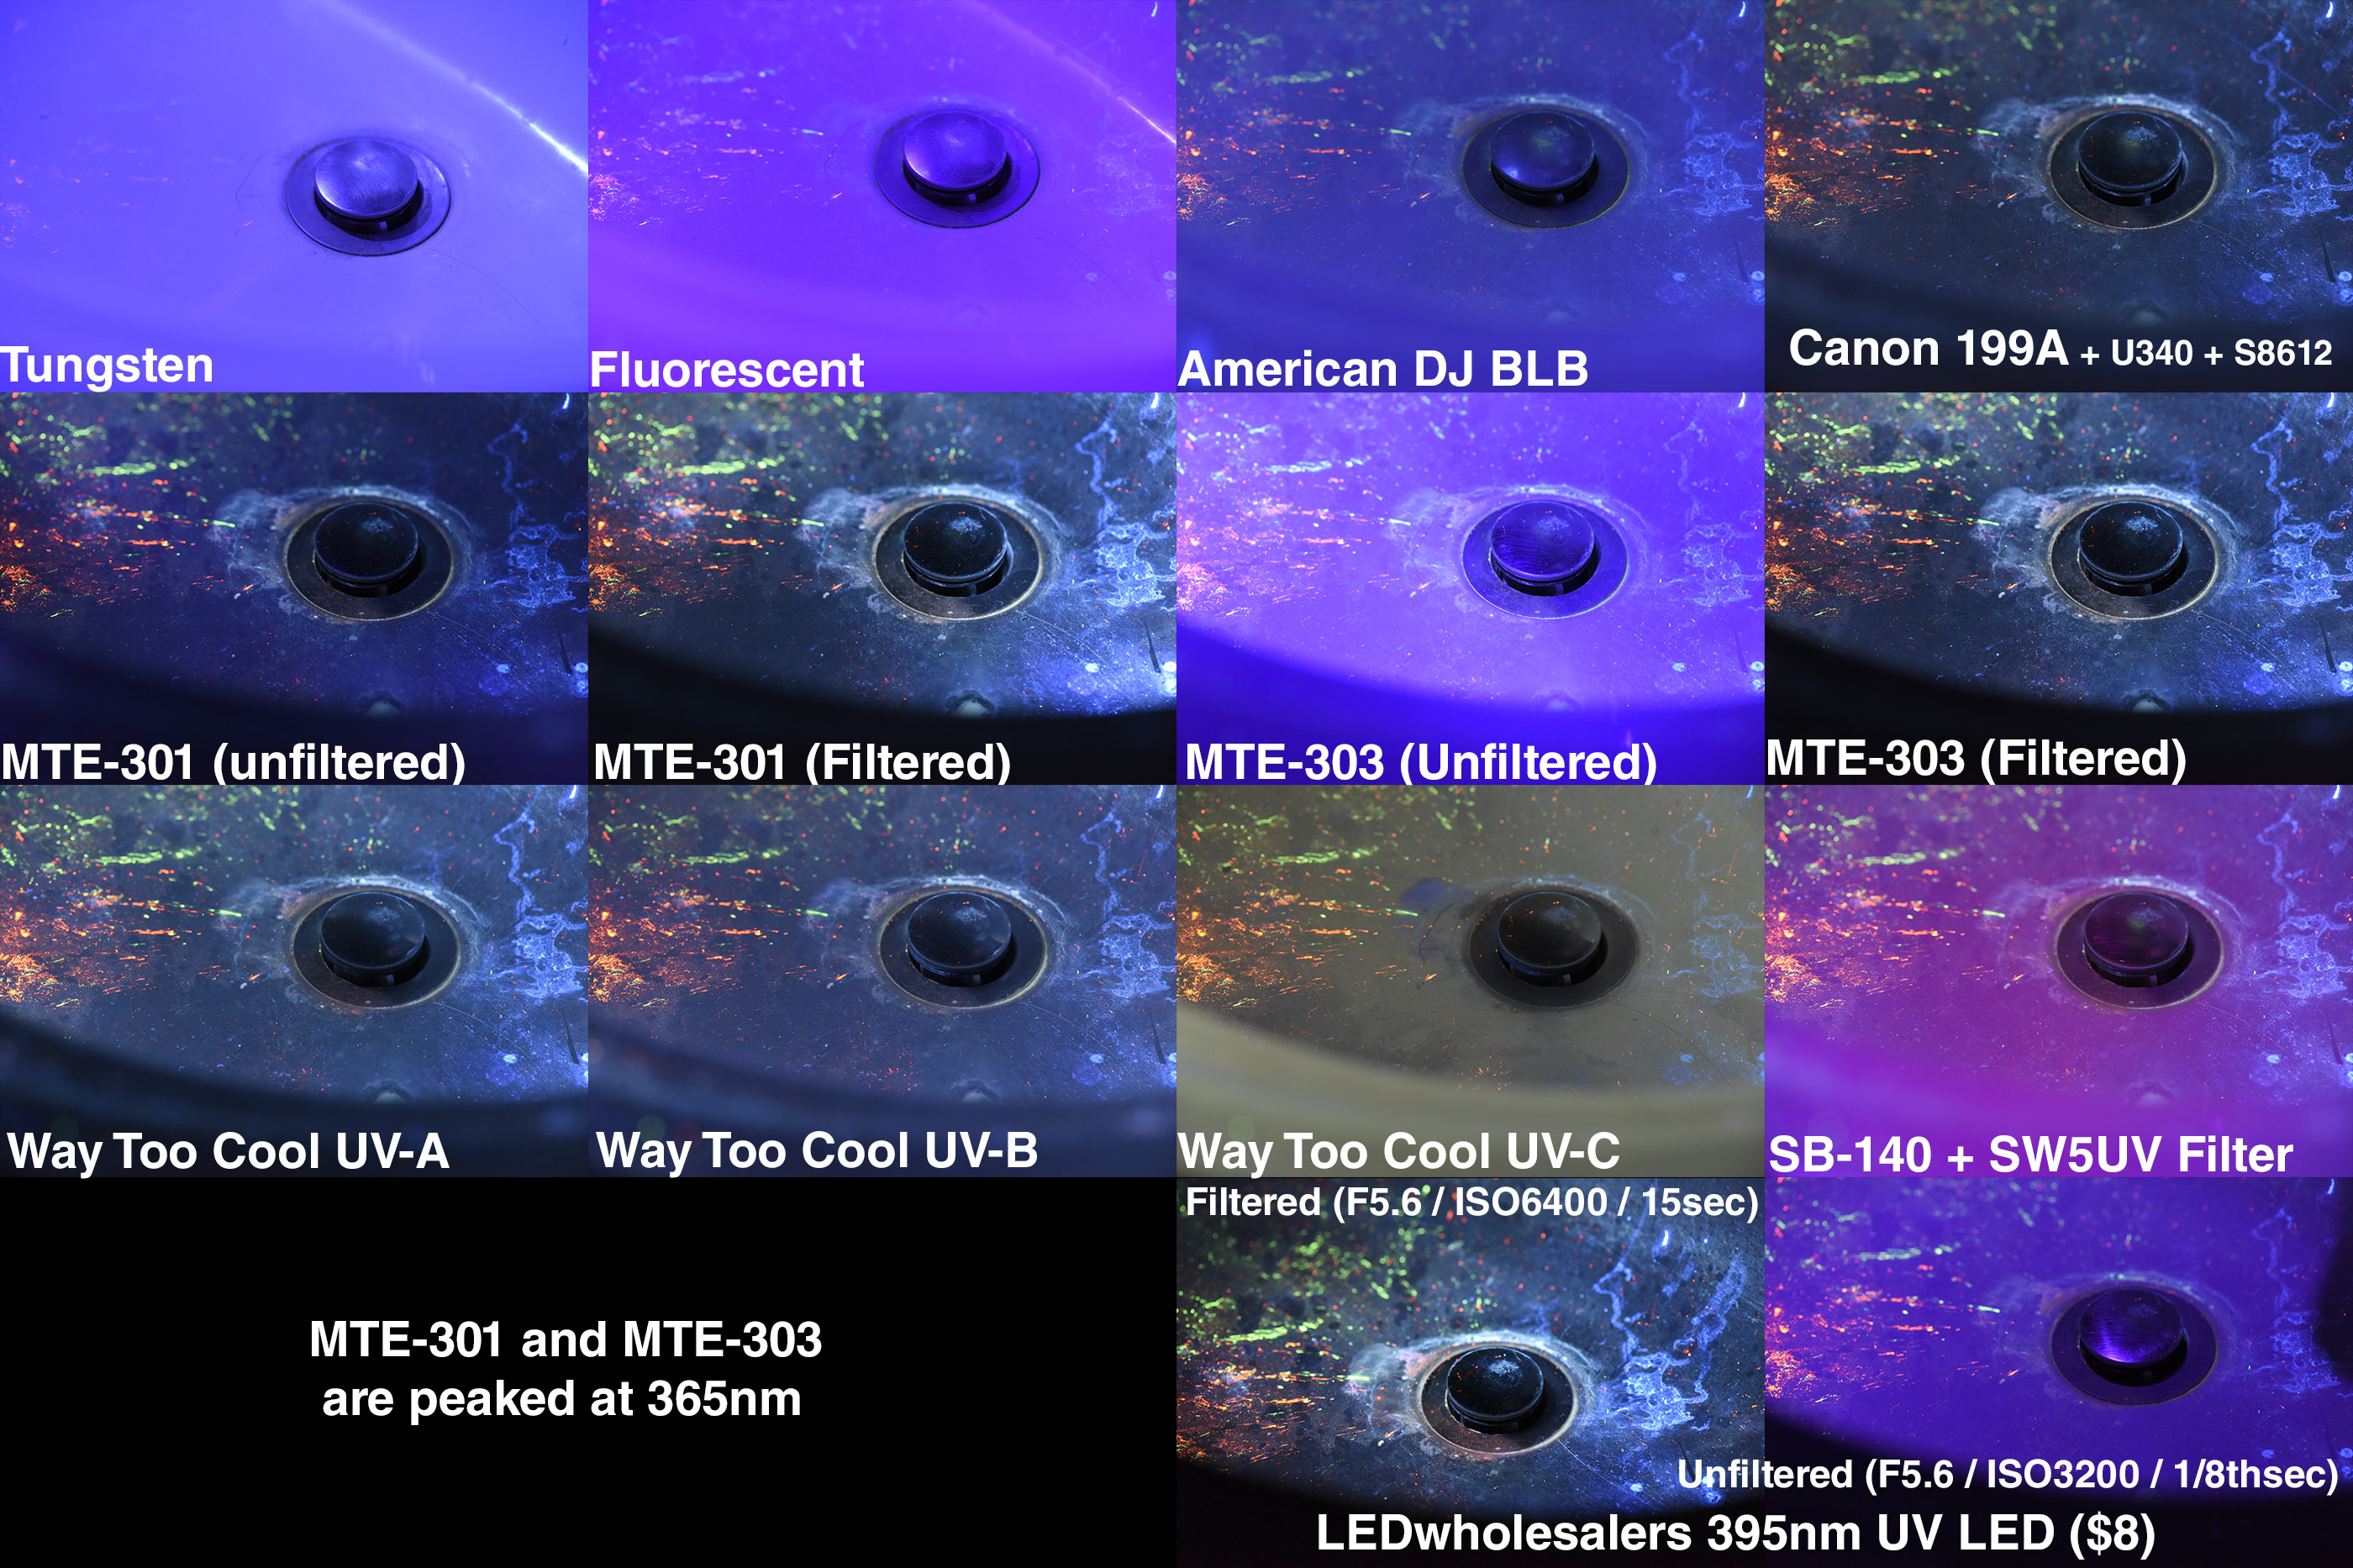
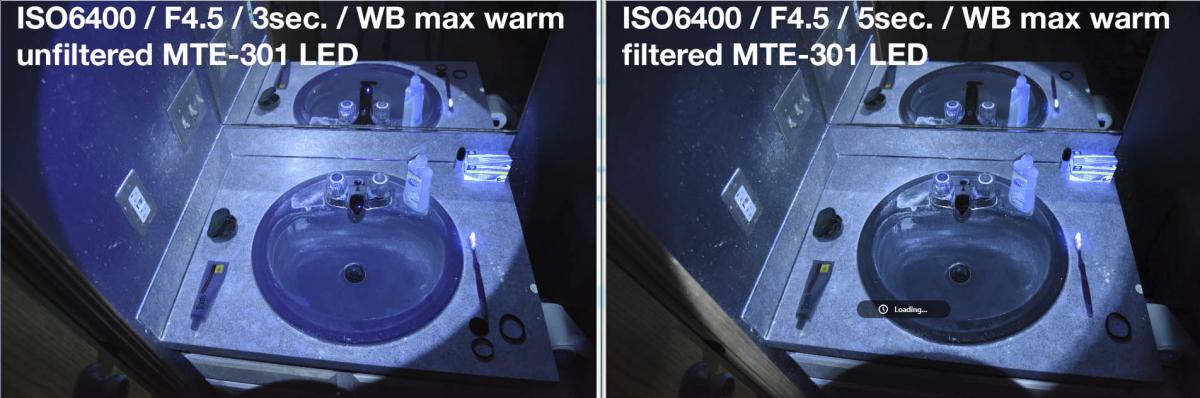
The filter used was the Hoya U-340. The $8 filtered UV LED may look ok, but it outputs barely anything at all. The Filtered MTE-301 image was F5.6 / ISO3200 / 1 sec and was held further away. Also notice how the stainless steel plug in the sink does not have any reflections when lit using ultraviolet-only light. You will see reflections on the plug if lit using visible light. Stainless steel does not re-emit any visible light when lit with UV light.
Filters
I recommend eBay seller uviroptics to get any filter you may need. You can message uviroptics and request specific sizes/shapes of filters.
There are basically two filters you should have for UVIVF photography: a VIS/IR Blocking filter to put directly in front of your light source, and a UV/IR Blocking filter to place in front of your sensor or lens. As far as my recommendations on which specific filters to use, these are the ones:
Baader-U Filter: Passes 320nm-380nm wavelengths, with a peak at 365nm. This is the a very high quality filter that blocks visible light and infrared light, and only allows UV-A light to pass through it. The Baader-U filter was originally made to be used on telescopes, but can be used on camera lenses in order to only allow UV light to enter through the filter (placing the filter over the lens is not applicable to UVIVF photography however, sense the only light we want to record onto the sensor is visible-light only), and it can be placed in front of LED torches, and portable modded speedlights, or any other type of light in order to block visible and infrared light.
The largest size available for this filter is a 48mm threaded screw-on filter, so you will need to use a step-down ring if you want to put it on a lens that uses a larger filter thread size on the front element of the lens (52mm or 55mm, for example). You can also get a step-up/down ring set and use the set as a funnel with a filter at the end of it, wedged around a Canon 199A flash – it fits and stays. The Baader-U is the de facto standard filter used on lenses for Reflected UV Photography, which is a different area of photography altogether that requires special lenses and modded cameras.
Hoya U-340 2mm: Good alternative to the Baader-U and can be placed on UV LED light sources to remove visible light. If you are using this filter in front of a modded flash, you will also need to stack it with a Schott S8612 1.5mm filter to further suppress infrared. Both filters (the U-340 and S8612) can be ordered in any shape or size from uviroptics. No one is selling 3D bulbulous rounded dome shaped filters at the moment (these would be useful for filtering some studio strobes).
Schott S8612 1.5mm: This filter is commonly used in combination with the U-340 filter above in order to suppress infrared light. When both filters are stacked together, the stack acts like the Baader-U filter. See test image below:
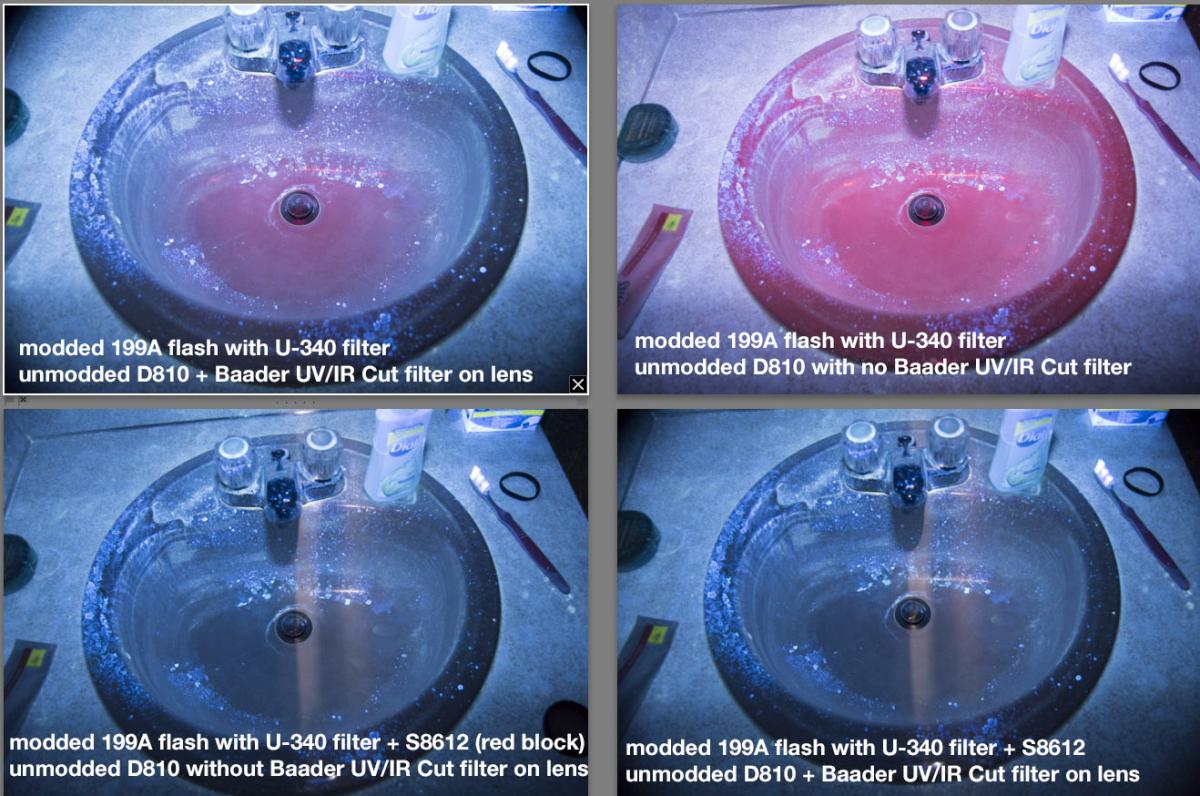
Note how in the first image the light source only has the U-340 filter and no S8612 filter – using this filter alone lets a little bit of red pass, and, depending on what you are shooting and what look you are going for, can potentially make your scene appear a bit more colorful and lively. Shooting with the U-340 filter alone also adds roughly ~.3-1 stop of light. See image below for another color difference example.
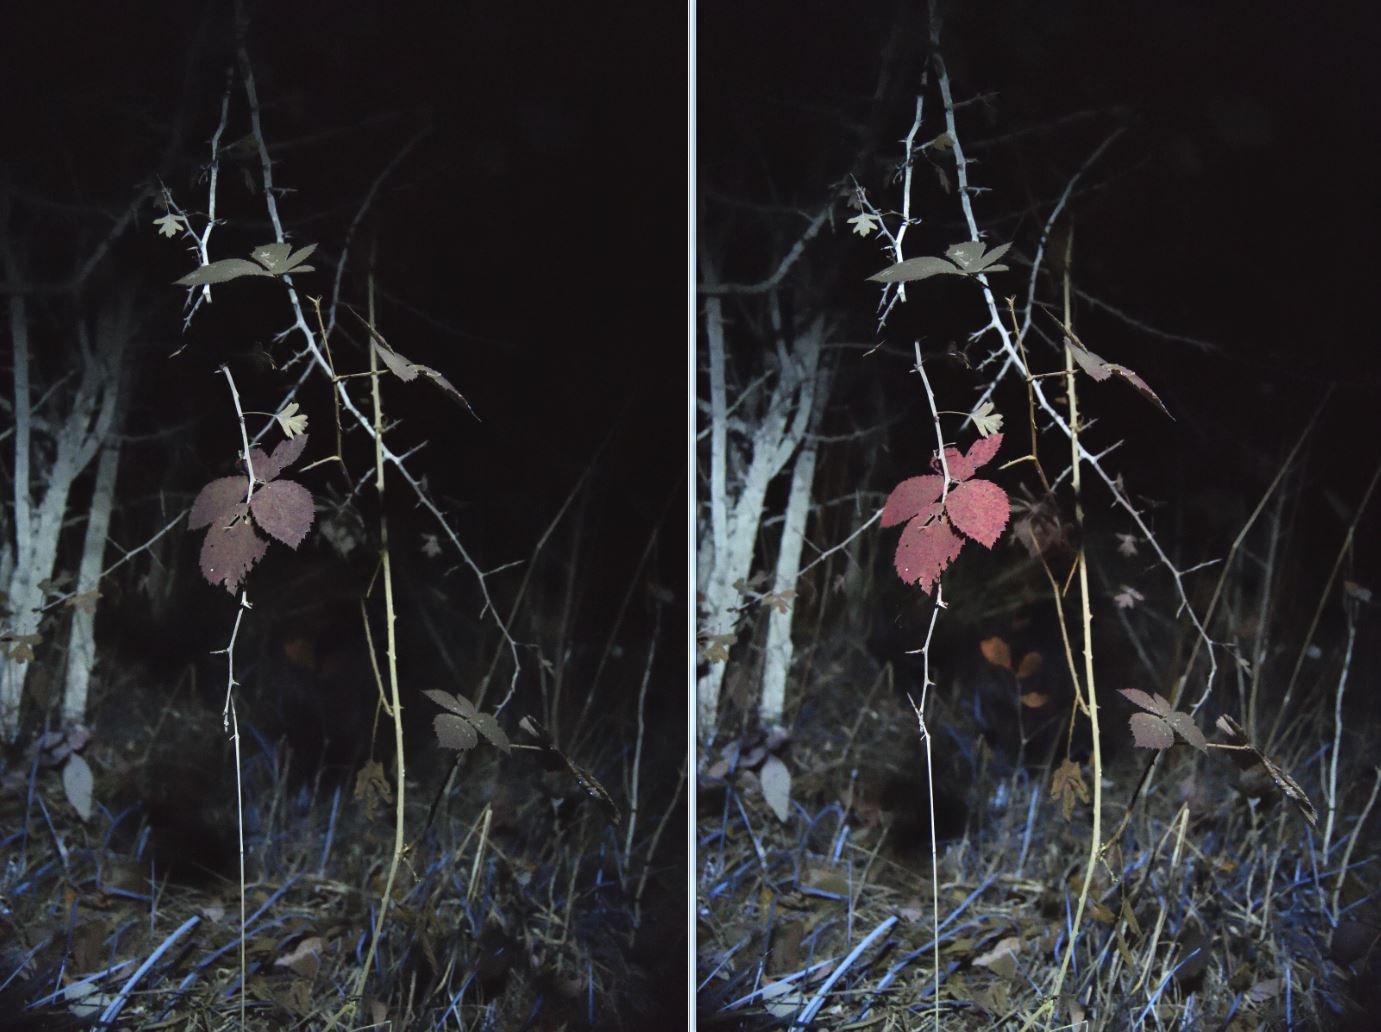
Left image is U-340 + S8612 filter. Right image is U-340 only.
2″ Baader UV/IR Cut Filter: 48mm threaded screw-on filter that can be placed on the front of your lens in order to remove any UV/IR light from entering the camera and being recorded onto the sensor. Doing so can optimize your results if your camera’s internal cut filter (ICF, the filter that sits right on top of the camera’s sensor) does not block enough UV/IR light. There are other filters also advertised as UV/IR cut filters, but I have not tried them. The Schott BG38 + GG400/GG420/GG435 filter glass could also be an alternative to the Baader UV/IR Cut if you needed a larger sized filter for your lens. To ensure you are recording only visible emitted fluorescence, you should place a UV/IR-blocking filter on the lens.
Broncolor UV attachment – This thing is expensive and if you look at the transmission chart it does technically leak visible light and lots of IR. Not exactly the best thing in the world, but if you already have some Broncolor lights with bulbs that have no UV coating on them, then it could be efficient for you to use this.
Another place to order specialty filters is Edmund Optics, but I have never done that. You can even create your own custom filters over at Omega Filters, but I have not done that.
Fluorescent Material
As I said earlier, everything looks different under UV light than when under visible light. Things that can glow/fluoresce particularly bright, however, include UV-reactive Holi powder, Pigment powder, makeup, minerals, biological material (plants, flowers, marine life, trees/wood, bacteria, insects, scorpions, reptiles, jellyfish, coral, fungi, snails, etc.), fluorescent dyes, highlighter fluid (fluorscin), fabric/laundry whitener, uranium glass, quinine is in tonic water and glows bright blue, anything that looks neon (including certain plastics, paper, and clothing), teeth, urine and urine stains, old stamps, bank notes, passports, and dirty toilets and stove tops.
Parts of the same plant can fluoresce differently depending on age, sunlight exposure, etc. Individual leafs on the same plant can sometimes fluoresce very differently compared to other leafs.
One thing I’ve always wanted to experiment with is fluorescent smoke, fog, or vapor, but I could not find any products available like this. Some type of material that could be inhaled and exhaled from a vaporizer would be very cool. If anyone knows how this could be done safely, leave a comment down below. UV holi powder is a very fine dust that can look similar to smoke.
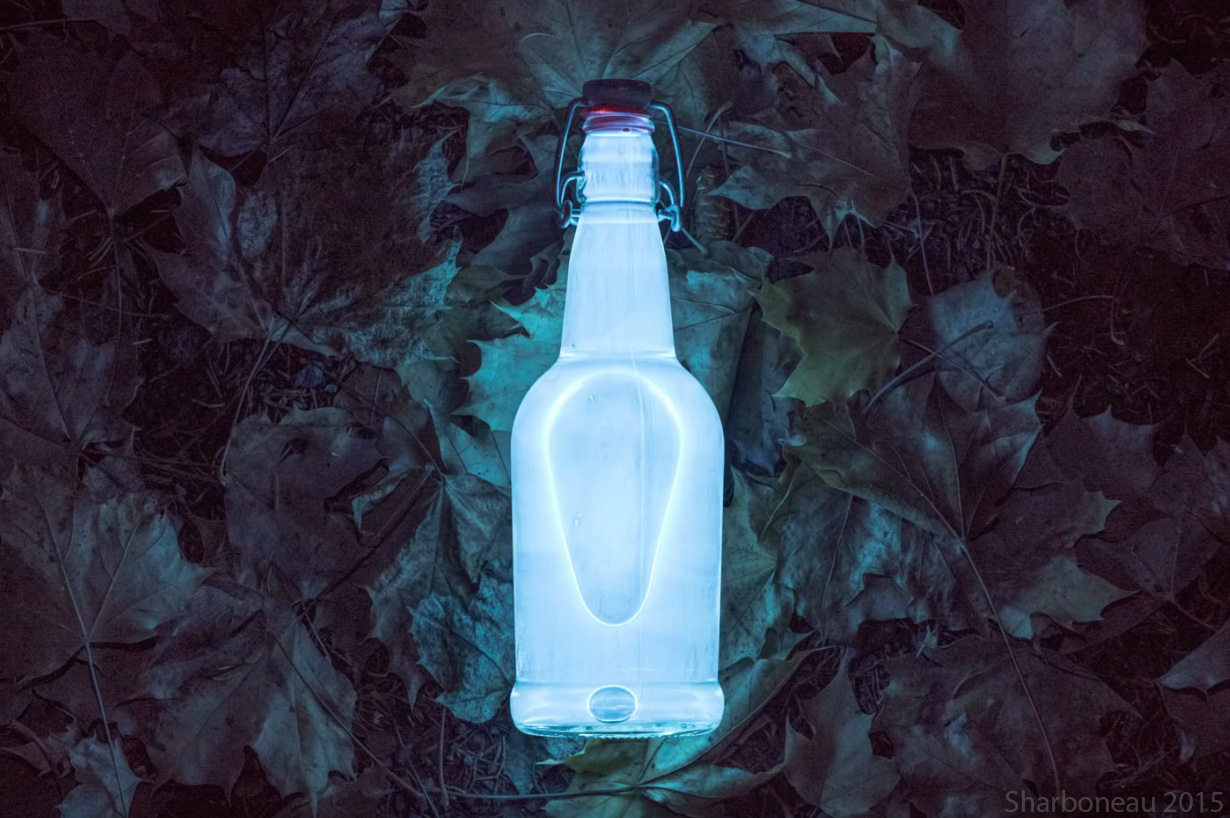
Tonic water in a clear glass bottle, lit using a modded Canon 199A flash on camera.
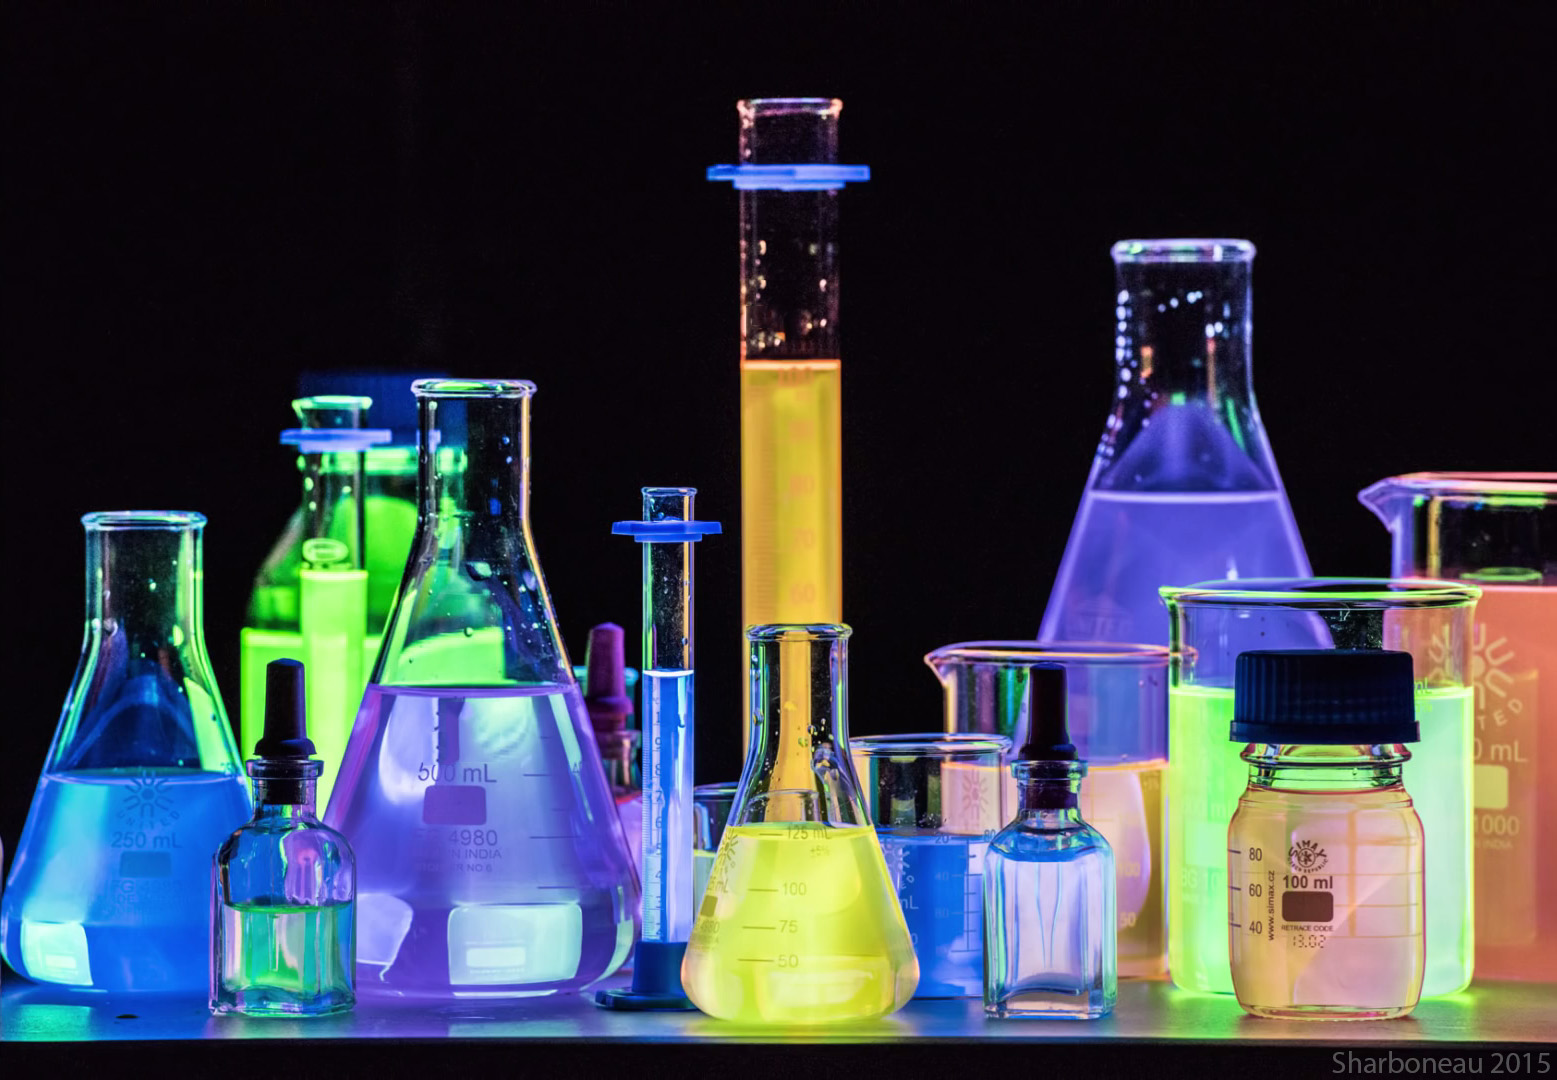
Various fluorescent dyes mixed with water inside of beakers and flasks.
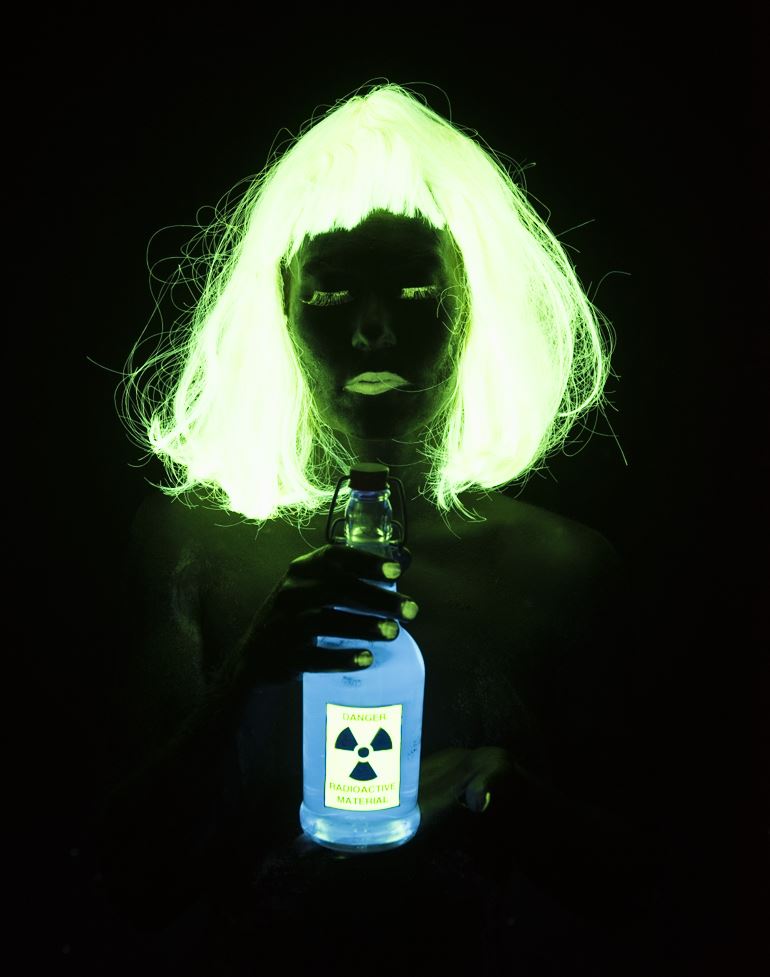
In this example, the wig fluoresces brighter than anything else in the frame, including the UV makeup, tonic water bottle, and the paper label on the bottle which had highlighter ink on it. Always use zinc oxide sunblock when photographing any exposed skin (including eyelids) for an extended period of time. Black latex body paint can be used to get a cleaner/darker look. ISO800 / F5.6. Image was post-processed. Click to see original.
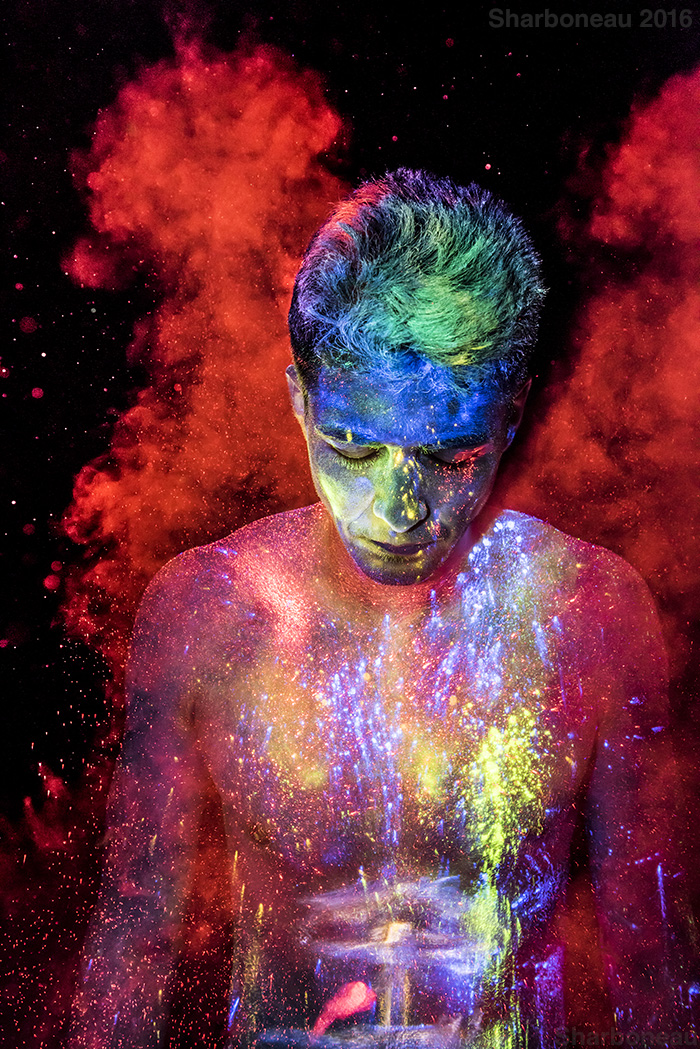
UV Blacklight Holi Powder, shot with one Canon 199A flash mounted on camera. A pile of red pigment powder was placed on his back and a person blew it upward from behind. Eyes are never to be opened. ISO1600, 1/160sec, f6.3

Collection of various fluorescent minerals under UV-A, UV-B and UV-C light. Image Credit: Hannes Grobe/AWI
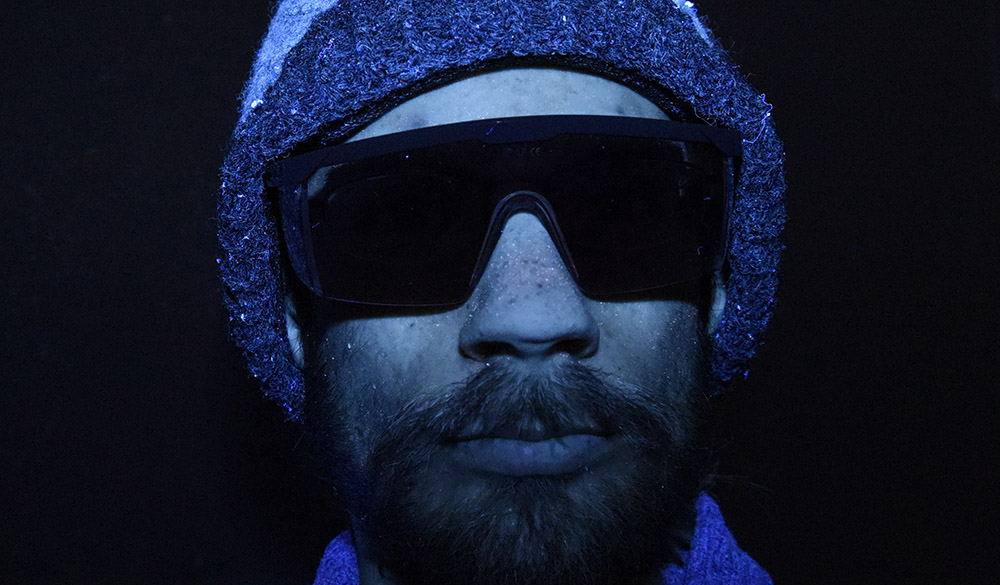
Clear UV-blocking safety glasses should appear black when lit with a UV light in a dark room.
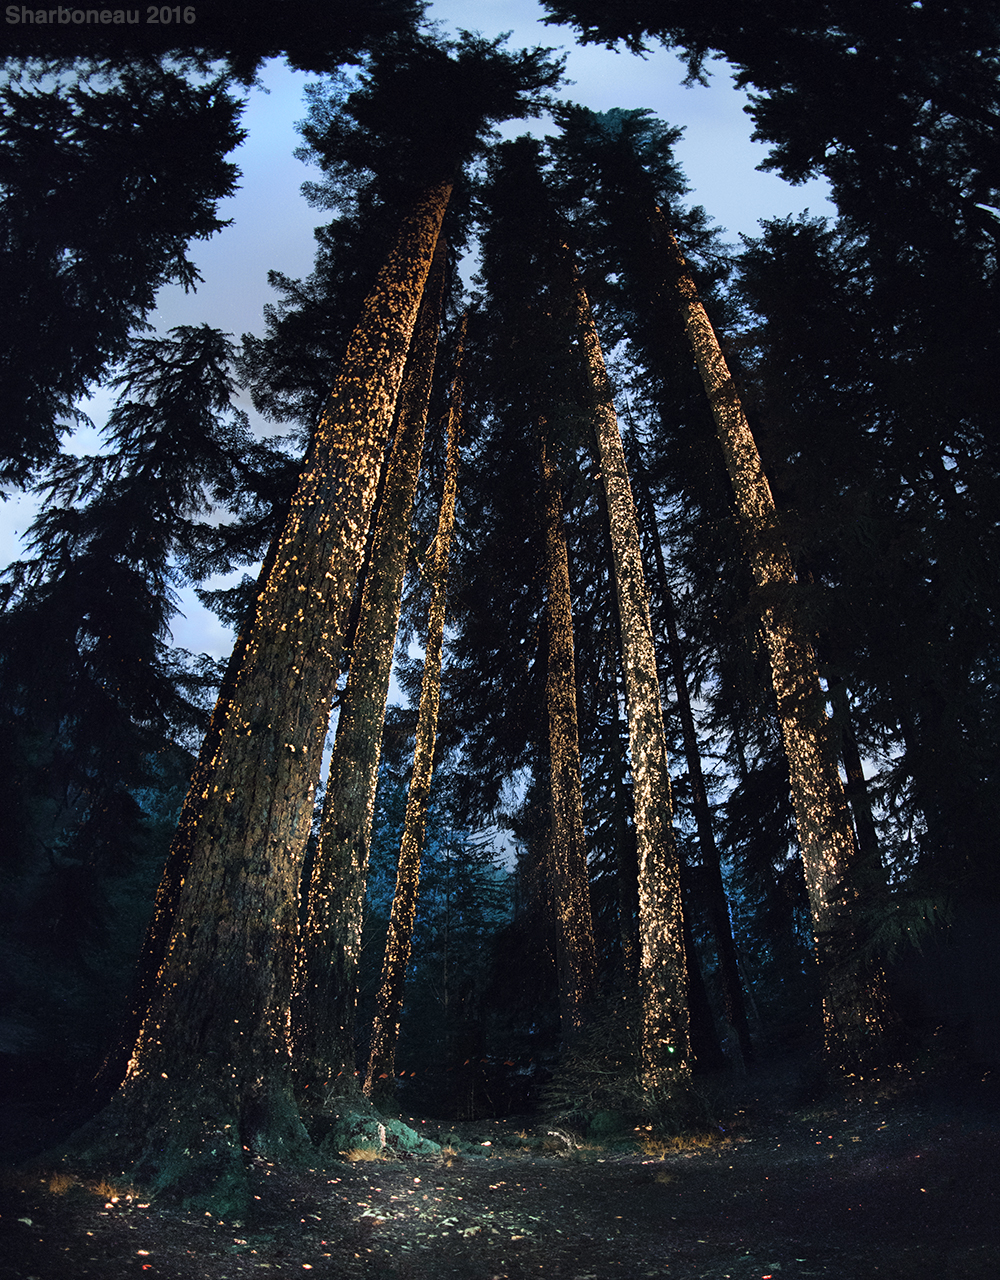
Glowing fungus on trees in a forest. Lit using MTE-303, multiple exposures combined.

Visible light in the upper background, lit from a campground, UVIVF on the foreground.
 Thanks for checking out my UVIVF Photography Tutorial. If you liked this article, sign up on my email list and check out my Trick Photography and Special Effects photography course, which contains 300 pages of e-book content and 9-hours of video content teaching you how to implement the best photographic special effects. If you are a complete beginner in photography with zero experience, but want to learn how to get industry standard image quality in the shortest amount of time possible, then check out my Photography Masterclass course.
Other UVIVF Resources:
https://www.extreme-macro.co.uk/uv-macro-lighting/
https://www.UltravioletPhotography.com
https://www.savazzi.net/photography/default.htm
https://www.fluorescents.com/page6.html
Pingback: D’étonnantes photographies révèlent la fluorescence des fleurs – Enjeux énergies et environnement
Pingback: Vaporizer 6th Element – E-Cigarette Coronium