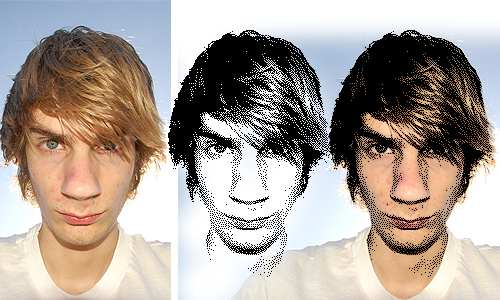
These animations are great for avatars and ID’s for websites.


![]()

Ok, so here is how you make these things.
- Open up your image in photoshop.
- Resize the image (Image > Image Size) to something similar to the examples. Animated GIFs aren’t supposed to be huge. I’d say no more than 500×500 pixels.
- Crop the image if necessary.
- Sharpen the image if you want to (Filter > Sharpen > Sharpen)
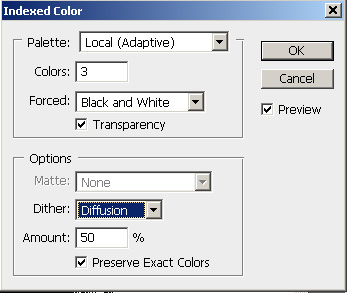
- Here is the fun part. In order to get the pixelated look, go up to Image > Mode > Indexed Color. Select Local (Adaptive) for the pallet. 3 for the Colors. Then set your Dither setting and the dither amount:

- Now, change the color back to RGB mode. Image > Mode > RGB Color
- If you want to make the image have a transparent background, erase the background to be completely white. Then Select the Magic Wand Tool, set the Tolerance to 0, and untick Anti-Aliasing and Contagious. Click on the background and hit the DELETE key.
- If you want the dissolving animation look, go up to Window > Animation. Duplicate your frame by clicking the little page icon on the bottom right of the Animation window.
- Select the FIRST FRAME, make it invisible by unticking the little eye icon by the layer in the Layers window.
- Now select just the SECOND FRAME, and make sure the eye icon is activated.
- Now, select both frames by holding down the CTRL key while clicking on both of them. They should both be highlighted.
- Next, click the Tween button
 on the bottom of the animation window.
 - Depending on how long you want the dissolve effect to last, a short number amount of frames (like 10) will dissolve the image quickly. A larger number (like 30) will make the dissolving effect last longer. Set the frame rate by selecting all the frames and then there is a button in the lower right.
- Select the second frame, then, while holding down the SHIFT key, select your last frame (this will select all your frames except the 1st one)
- In the layers window, set the blending mode to Dissolve.
- You’re pretty much done! You can add other things as well, like multiple frames.
- To save the animation properly, click File > Save For Web… Make sure “GIF” is selected in the second drop down box in the top right.
- Save it.


5 Responses to How To Make A Photorealistic Pixelated Animated GIF in Photoshop