The following content is only an excerpt from my Trick Photography and Special Effects eBook. If you want all the additional content that has now been reorganized, updated and revised, you can get the ebook here.
These are complete immersive panoramic images (A complete spherical field of view… It’s like a 0mm lens.) You can use software like Hugin [I now actually recommend PTGui instead of Hugin] to stitch them, and Flexify to manipulate them. If you want to learn more about what a 360×180 panorama exactly IS, head here and read the description. If you want to get right into making these things, keep reading.
.
.
This article is pretty long, so if you want just the jist of things, watch this video. If you are serious and what to actually execute taking 360×180 panos, then watch the video AND read the article 🙂
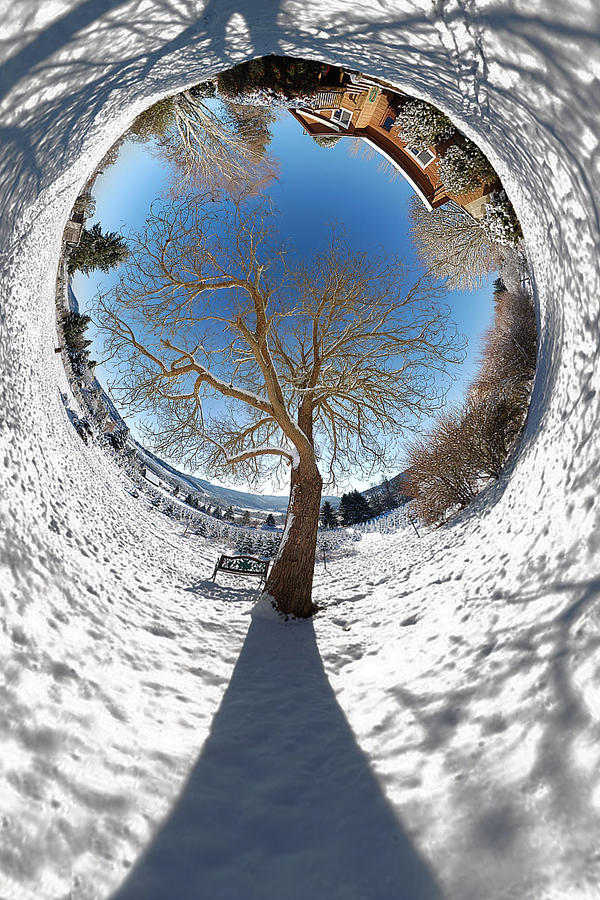
By taking 360×180 panoramas and stitching them in certain ways, the environments will look like little planets, inverted planets, or a number of other crazy things. It does require some patience, but it is definitely worth doing. People will be asking you “How did you do that?” every time you show them a 360 stereographic stitch.
You will need a digital SLR (or even a point and shoot camera), and a program called Hugin. It is also recommended that you have a tripod with a panoramic tripod head, and the Flexify Plug-in for Photoshop, but it isn’t required. I will talk about all of these in this article.
Taking hand-held 360 panoramas:
 First, set your camera to take SMALL JEPGs. You CAN take larger jpegs, but I wouldn’t recommend it until you are successful with your first completed panorama. The resolution/image size builds up fast when you are taking 360×180 panoramas.
Take your digital SLR and use the widest angle lens you have. Mine is an 18-55mm kit lens, set on 18mm. Next, point the camera to the ground and start taking pictures around you. Shoot in vertical orientation. Traditionally speaking, it is best to use manual mode on your camera with manual focus (and this is the method I recommend using), but I’ve discovered that using Aperture Priority mode (or even full Auto mode) with automatic focus works too. If you are using Automatic Mode, I would suggest your camera to be set on matrix metering.
Once you have the first row done, move your camera up and take the next row of pictures, making sure that the field of view will overlap by about 25% or more. On my camera/lens, I have to take 4 or 5 rows of pictures, with about 12 pictures in each row. This comes out to be about 65 total pictures (But that is on my specific lens and camera, it might be different for yours). If you’re using a super wide angle fish eye lens, you can get the job done by only taking 5 pictures. The resolution won’t be as large, but hey, it takes a heck of a lot less time. Try to rotate your body around the camera rather than rotating the camera itself; it’s a good idea to keep the camera in the same spot.
Once your done taking those pictures you need to point the camera straight up at a 90 degree angle. This is called the Zenith. Then take another picture straight down at 90 degrees (try to move your feet out of the way, if possible) This is called the Nadir. I usually mess up on the zeniths and nadirs, and that’s fine, but the image won’t come out looking perfect: There will be a little black spot where the zeniths and nadirs are supposed to be. You will see what I mean if you didn’t take these correctly (it’s not that big of a deal.)
Now we are ready to stitch them all together on the computer!
Download a program called Hugin, install it, then boot that mother up.
Using Hugin to stitch 360 panoramas:
Load all of your images into the program. Hugin will take a while to process all of your images, depending on your computer speed and what size you took the JPEGs at (this is why I recommended shooting small JPGs.)
It takes about 10 minutes to process all of the images on my computer, so be patient. I would recommend closing all other applications you aren’t using. This will save memory usage, which Hugin needs. I’ve found that if I had too many programs running, Hugin would run out of memory and not do its job.
Once the images are done being processed, one of two things will happen. Either 1) A dialog box will appear saying that it couldn’t stitch some images together, and you need to manually fix them, or 2) a preview window will pop up, showing your panorama. If the former happens, you will need to add points on the images that are in the same spot on each photograph. Hugin will tell you what images need this. If it isn’t possible to add points (this usually happens with the zenith or nadir), just delete the images, and then re-align the pano.
Now go to the top and click Preview. Here is your image. If you want it to look like a planet, select “stereographic” from the drop down box. Then, when you are looking at the preview, left-click on the spot where you were standing to take the photograph. This will morph the image into a sphere at that specific point. And there you go! You can adjust the field of view by using the sliders on the bottom and right side of the image, but be somewhat conservative with this feature, because the image will get distorted on the edges if you over-do it. You can also straighten the horizon by clicking that straighten icon at the top, but I usually don’t see any difference when doing that.
SIDE NOTE: you can also “optimize” your image. Click the Optimizer tab and select which parameters you want optimized. This supposedly makes everything more perfect, but doesn’t always work substantially, sometimes I don’t see any difference after using it. Remember to preview your image again if you use this feature
Close the preview window, and then click on the Stitcher tab. Click the “optimize image size” button (this makes the image have more resolution) and then finally click Stitch. Your image will then be saved as a TIFF (or a JPEG, if you selected this option in the Stitcher tab.) It takes a long time to stitch it all together, so just go get something healthy to eat while it’s doing its thing. When it is done, you can open up the directory to where you saved it, and then see its glory.
Stitching HDR Images (optional):
If you want to stitch High Dynamic Range images, I WOULD recommend making your HDR composites from 1 RAW file to save time, but I haven’t figured out a way to batch process a bunch of single RAW files, so take 2 or more images. And please, use Manual Mode or Aperture Priority mode if you do this.
You need a program called Photomatix. Open Photomatix up and select batch processing, Choose the settings you want and be sure to tell it how many images are going to be used for each HDR composite, and make sure ‘360 image’ is ticked on. Batch process all of your photos, and then stitch your new HDR images together just as you would normally in Hugin.
Perfecting The Stitch (optional):
Yes, you can take hand-held 360×180 panoramas, but when you do this, there will be “parallax errors”, especially if you are taking pictures of things that are close to the camera (like inside an interior environment, or if you were taking your pano right next to a tree or something). The stitching software can’t deal with this very well, so your pano will be less than perfect.
To fix this, you need to find the nodal point on your lens, and then rotate your camera around that point while taking panoramas. You will use a special tripod head to do that.
Finding The Nodal Point (optional):
There is a pretty good tutorial on how to find the nodal point of your lens here, it has pictures. I recommend reading that to understand what a nodal point is.
Or, you can do it my way. It’s a little different, but it serves the same purpose:
To find the nodal point of your lens, go inside and find a window somewhere. Stick a piece of masking tape on the window. Get a tripod and put the handle 90 degrees straight up in the air, and then rest your lens on the tip of the handle. Go wide angle, and look through the viewfinder, have the masking tape centered in the frame. Keep in mind what is behind the masking tape on the outside of the window. Rotate your camera to the left or right until the masking tape is at the very right or left of the frame. You will then see that the object that was originally directly behind the masking tape is now a little bit towards the left or right of the masking tape!
Move your lens forward or backward (just a little) until you have found the sweet spot where this phenomena no longer happens when rotating your lens on the tripod handle. The object that is behind the masking time should STAY directly behind the masking tape, whether the masking tape in the middle, left, or very right of the frame. Once you have found this point, take a pen or something and mark a little dot on your lens to remind you where this point is. You have found the nodal point for that specific lens and focal length. You will need to know where the nodal point is to configure your (purchased or DIY) panorama tripod head.
Panoramic Tripod Heads (optional):
If you have lots of money, you can buy a pano head anywhere from $80-$200. But, if you are cheap like me, you can make one yourself for a few bucks.

My panohead looks like this one
The one I made is made out of wood, and can only be used with my specific lens, camera, and focal length. The tutorial I used can be found here: How to build a panoramic tripod head. This is probably the most easiest, quickest design. Just make sure that when you build it, the ‘Side’ arm is long enough for your camera to be pointed completely up, enabling you to take proper Zenith shots. The first time I made mine, the side arm was too short, and I couldn’t take a proper zenith snot. The nadir shots won’t be ideal with this pano-head, but it is like that with any panoramic head. You can’t make the tripod invisible, for pete’s sake.
There are other panoramic heads where you can adjust the pano-head for any lens/camera combination, but I couldn’t find any useful DIY tutorials of these online; it would probably be better just to buy one.
If you want to purchase a panoramic tripod head, I recommend the Nodal Ninja. It allows you to take full 360×180 panoramas.
Manipulating Panoramas in Flexify (optional but recommended):
Flexify 2 is an EXCELLENT Photoshop plug-in. It is specifically designed for manipulating 360×180 panoramas.
In order to use Flexify properly, you need to stitch your images using Hugin first. Make sure you are stitching them in equirectangular mode (not stereographic). Once you’ve got that done, open your image in Photoshop and click on Filter > Flamingpear > Flexify (assuming you already downloaded/purchased the Flexify plug-in and put it in your plug-ins folder)
Next, select the input to be Equirectangular, and the output can be anything you want, there are lots of options. If you want it to look like one of those 360 planet panoramics, select Stereographic or Hyperbolic. Then, set the Latitude to -180, or 180. And if you want to adjust the field of view, mess around with the FOV slider. Keep in mind that if you slide it TOO much one way or the other, your image will look pixelated. You can always readjust it. Also, keep in mind that if you want if you want this to be a square image, you will have to resize it in Photoshop (Image > Image Size) before you open it up in Flexify. I did not do that in this example, however.
Using Hugin+Flexify is better than making stereographic images straight from Hugin because Flexify has more control of what you want your final output to look like. It’s just really nice to use and I highly recommend it.
As you have probably noticed, there are lots of output options. A lot of them are “cut outs” (the image isn’t projected to fill an entire standard rectangular frame). Here is a list of ones that DO fill up the entire frame.
- Rectilinear
- Hyperbolic
- Stereographic
- Cylindrical
- Wetch (this is very wide)
- Square
- Swoop
- Oculus (Apparently this is like Stereographic, but the distortion is near the center instead of the edges)
- Triptych
- Tetrapytch
- Shift Lens
- Mercator (you can make little lumps)
- Tetra Tile
- Hyperdouble (Two 360’s side by side morphed into each other!)
- Hypertriple
- Mercator Cross
- Mercator star
- 4 Views, 12 Views, 24 Views, 60 Views, 72 Views
- Equi Tall
- Semistereo
- Squoculus
- unFish
- Lagrange Plus
- Stereo Twice (this is like two mirrored Stereographics merged together)
- Stereo Thrice
- Equal-Area Cylinder
- Equal Squarea (who comes up with these names, anyway?)
- Square Fish 1
- Square Fish 2
Some examples of these different types can be found here: http://vlue.deviantart.com/gallery/8314864/Panoramics
If anyone knows how to make VIDEO with these, let me know!

Post your questions and results on the comments!


Pingback: PanoPlanets » Blog Archive » Pano Planets
Pingback: 360x180 Polar Panoramas